目录

Ubuntu搭建内网DNS服务器

概述

公司中经常会搭建一些内部的网站,这些网站只能在公司的局域网中使用(链接同一个路由器的电脑),当访问这些网站时需要在浏览器中手动输入服务器 IP 地址进行访问,无法通过域名访问,这时可以通过搭建公司内部的 DNS 服务器解决。

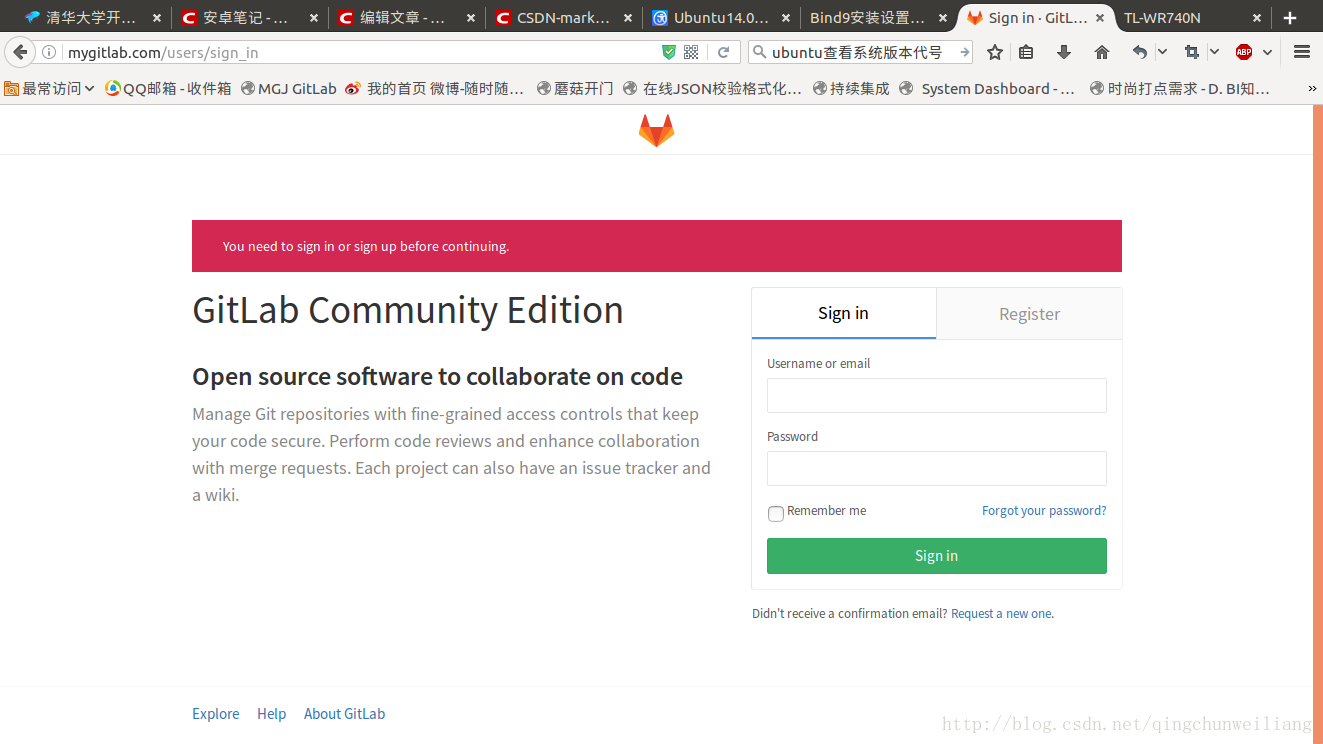
现在想通过访问 http://mygitlab.com 就可以访问到位于192.168.0.100主机上的自己搭建的 gitlab 服务器。本文中要搭建的 DNS 服务器和 gitlab 服务器在同一台主机上,IP 都是192.168.0.100,当然也可以不在同一台主机上。

下载bind9

执行如下命令

1
apt-get install bind9

bind9配置文件

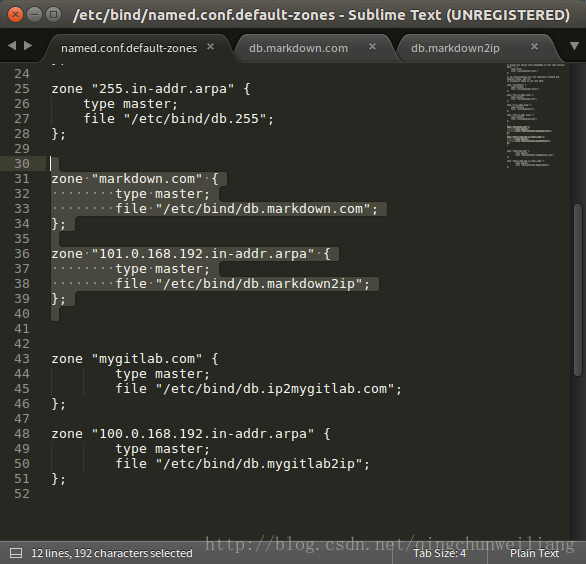
找到/etc/bind/name.conf.default-zones文件,并在末尾添加。

 1
 2
 3
 4
 5
 6
 7
 8
 9
10
11
12
# 这里是需要两个文件
zone "mygitlab.com" {
        type master;
        # 文件名
        file "/etc/bind/db.ip2mygitlab.com";
};

zone "100.0.168.192.in-addr.arpa" {
        type master;
        # 文件名
        file "/etc/bind/db.mygitlab2ip";
};
/ubuntu%E6%90%AD%E5%BB%BA%E5%86%85%E7%BD%91dns%E6%9C%8D%E5%8A%A1%E5%99%A8/image_1dddn8kfjpg9n339oa16tm1vau9.png

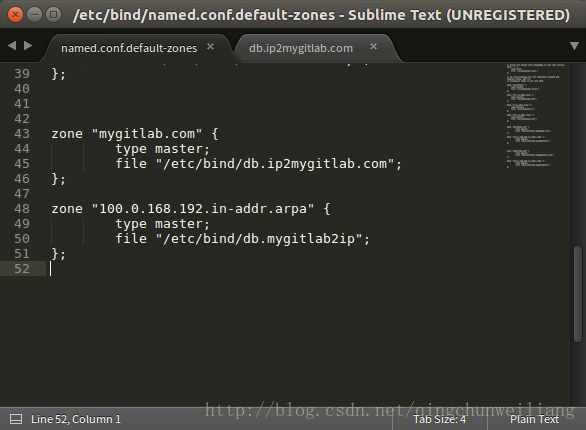
其中100.0.168.192是 mygitlab 服务器的ip的反写,若你的服务器 IP 是 abc.def.ghi.jkl 则在这要写成 kl.ghi.def.abc。

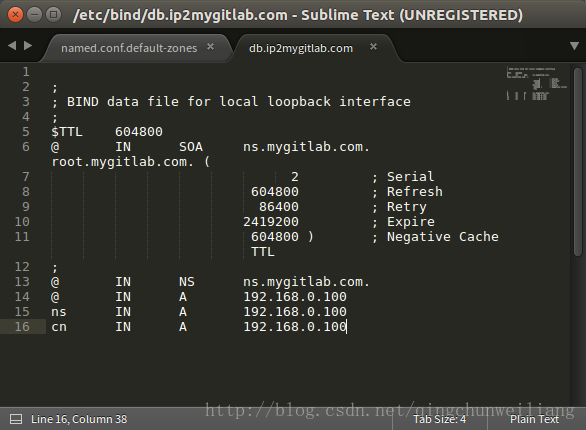
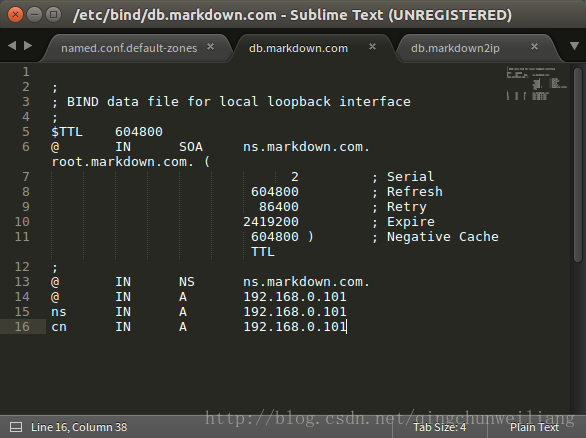
然后在 /etc/bind 中创建 db.ip2mygitlab.com 文件和 db.mygitlab2ip 文件,注意这两个文件名要和 name.conf.default-zones 中配置的 file 相同。然后在 db.ip2mygitlab.com 文件中填写如下内容,注意,需要把下面的 mygitlab.com 换成你的域名,不要漏掉了域名后面的小数点,192.168.0.100 是 mygitlab 服务器的 IP,需要替换成你自己的。

 1
 2
 3
 4
 5
 6
 7
 8
 9
10
11
12
13
14
15
;
; BIND data file for local loopback interface
;
$TTL    604800
@       IN      SOA     ns.mygitlab.com. root.mygitlab.com. (
                              2         ; Serial
                         604800         ; Refresh
                          86400         ; Retry
                        2419200         ; Expire
                         604800 )       ; Negative Cache TTL
;
@       IN      NS      ns.mygitlab.com.
@       IN      A       192.168.0.100
ns      IN      A       192.168.0.100
cn      IN      A       192.168.0.100
/ubuntu%E6%90%AD%E5%BB%BA%E5%86%85%E7%BD%91dns%E6%9C%8D%E5%8A%A1%E5%99%A8/image_1dddndt3bon9uq41ajes9d7hpm.png

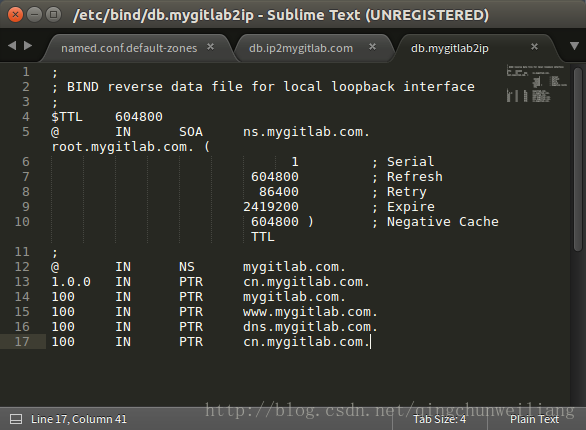
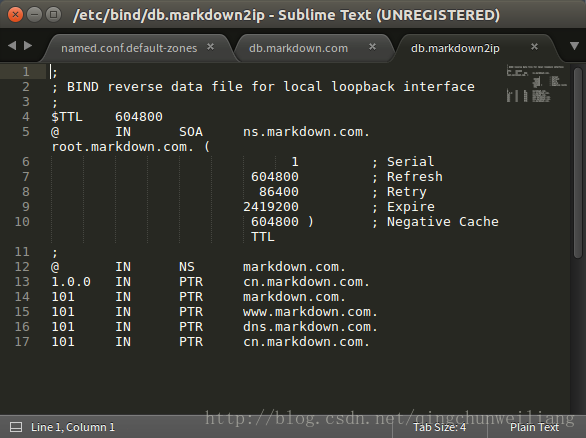
然后在 db.mygitlab2ip 文件中填写如下内容,同样要替换 mygitlab.com 为你的域名。100是mygitlab服务器的ip的最后一段,需要替换成你自己的。

 1
 2
 3
 4
 5
 6
 7
 8
 9
10
11
12
13
14
15
16
17
;
; BIND reverse data file for local loopback interface
;
$TTL    604800
@       IN      SOA     ns.mygitlab.com. root.mygitlab.com. (
                              1         ; Serial
                         604800         ; Refresh
                          86400         ; Retry
                        2419200         ; Expire
                         604800 )       ; Negative Cache TTL
;
@       IN      NS      mygitlab.com.
1.0.0   IN      PTR     cn.mygitlab.com.
100     IN      PTR     mygitlab.com.
100     IN      PTR     www.mygitlab.com.
100     IN      PTR     dns.mygitlab.com.
100     IN      PTR     cn.mygitlab.com.
/ubuntu%E6%90%AD%E5%BB%BA%E5%86%85%E7%BD%91dns%E6%9C%8D%E5%8A%A1%E5%99%A8/image_1dddo0fnu1nbgk2b11cj1ste1cvg13.png

然后修改/etc/bind/named.conf.options文件为如下内容:

 1
 2
 3
 4
 5
 6
 7
 8
 9
10
11
12
13
14
15
16
17
18
19
20
21
22
23
24
25
26
27
28
29
options {
    directory "/var/cache/bind";

    // If there is a firewall between you and nameservers you want
    // to talk to, you may need to fix the firewall to allow multiple
    // ports to talk.  See http://www.kb.cert.org/vuls/id/800113

    // If your ISP provided one or more IP addresses for stable 
    // nameservers, you probably want to use them as forwarders.  
    // Uncomment the following block, and insert the addresses replacing 
    // the all-0's placeholder.

    // 转发?
     forwarders {

        202.101.172.35;
        202.101.172.47;

     };

    //========================================================================
    // If BIND logs error messages about the root key being expired,
    // you will need to update your keys.  See https://www.isc.org/bind-keys
    //========================================================================
    dnssec-validation auto;

    auth-nxdomain no;    # conform to RFC1035
    listen-on-v6 { any; };
};

其实只需要修改:

1
2
3
4
 forwarders {
        202.101.172.35;
        202.101.172.47;
     };

这个很关键,网上很多人说修改成8.8.8.88.8.4.40.0.0.0,当修改成这三个后会发现访问外网特别慢,比如在公司内网访问 baidu.com,就非常慢,访问任何一个外网都很慢,原因是本地没有配置外网域名对应的 IP,所以 bind9 会去8.8.8.88.8.4.40.0.0.0这几个 DNS 服务器查询 IP,本文中修改成了202.101.172.35;202.101.172.47;是因为自己搭建的 DNS 服务器位于杭州,用的电信的网,所以设置成了202.101.172.35;202.101.172.47;,具体设置成多少由你所在地区的网络提供上决定(你可以先百度一下ip就可以知道用的是电信还是联通还是移动的网,然后在百度一下你所在城市对应网络提供商的dns服务器的ip即可)。

然后执行 service bind9 restart 重启 bind9 DNS 服务器。
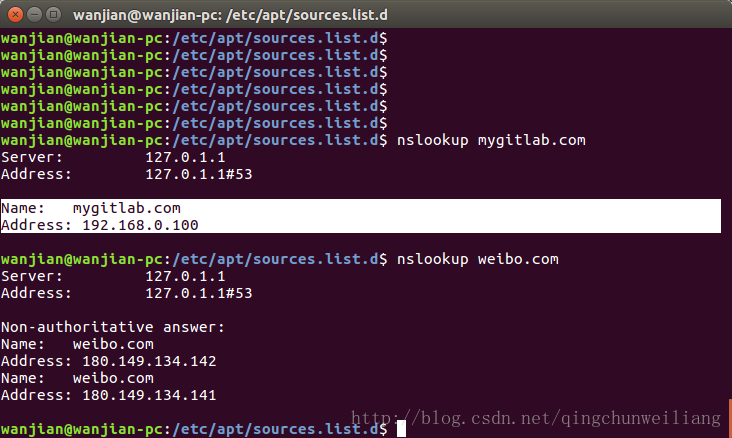
/ubuntu%E6%90%AD%E5%BB%BA%E5%86%85%E7%BD%91dns%E6%9C%8D%E5%8A%A1%E5%99%A8/image_1dddo63fd1kmpal7vhi1s9n6671g.png

分别试了下 mygitlab.comweibo.com,很快就返回了数据,若很慢说明 forwarders 中配置的外网 DNS 服务器有问题。

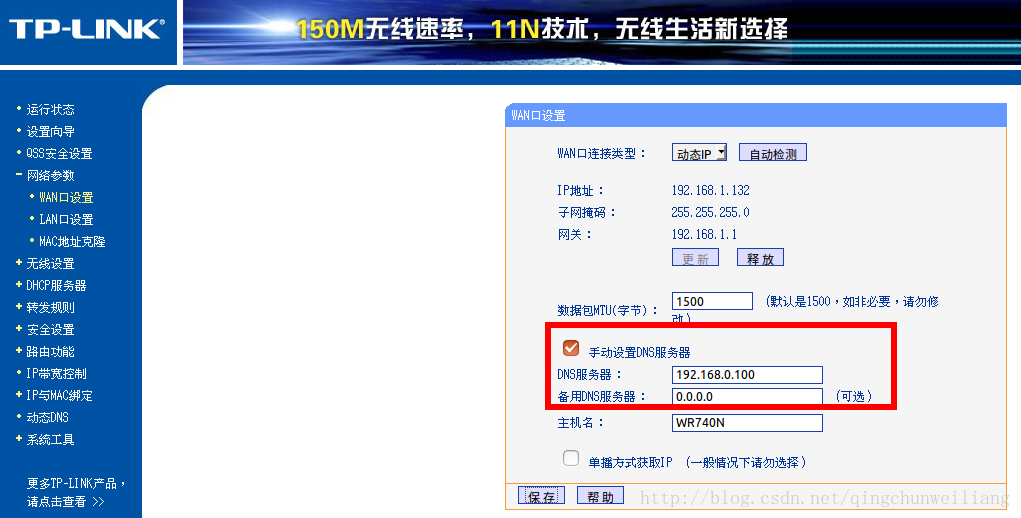
接下来还需要修改路由器配置,把 DNS 服务器 IP 换成自己搭建的 DNS 服务器的 IP 即可。

登录路由器,找关于 DNS 设置选项,我的路由器是 tp-link,把 DNS 服务器 IP 换成自己搭建的 DNS 服务器的 IP 就可了,我的是192.168.0.100,备用的 DNS 服务器可以不用填。

可以通过 nslookup 你的域名 查看是否配置成功。

/ubuntu%E6%90%AD%E5%BB%BA%E5%86%85%E7%BD%91dns%E6%9C%8D%E5%8A%A1%E5%99%A8/image_1dddo81av1rgi14l8v0sqmf188n1t.png

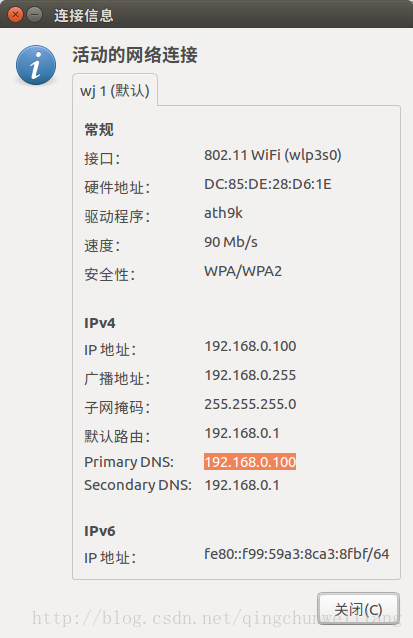
然后其他电脑断开网络链接,然后重新链接 wifi,这时在网络链接中就可以看到 DNS 服务器 IP 变成了自己搭建的 DNS 服务器的IP 了,备选的 DNS 服务器是路由器的 IP。

/ubuntu%E6%90%AD%E5%BB%BA%E5%86%85%E7%BD%91dns%E6%9C%8D%E5%8A%A1%E5%99%A8/image_1dddo8jrmoom1lgpdje1chanri2a.png /ubuntu%E6%90%AD%E5%BB%BA%E5%86%85%E7%BD%91dns%E6%9C%8D%E5%8A%A1%E5%99%A8/image_1dddo9127gdgrbbm0ceq216kl2n.png

我还在192.168.0.101主机上搭建了一个 marketdown.com 服务器,配置只需要修改成如下配置即可:

/ubuntu%E6%90%AD%E5%BB%BA%E5%86%85%E7%BD%91dns%E6%9C%8D%E5%8A%A1%E5%99%A8/image_1dddoacvpc4grsn145bk4qb3734.png /ubuntu%E6%90%AD%E5%BB%BA%E5%86%85%E7%BD%91dns%E6%9C%8D%E5%8A%A1%E5%99%A8/image_1dddoam0u1vi4crcb6a127h42d3h.png /ubuntu%E6%90%AD%E5%BB%BA%E5%86%85%E7%BD%91dns%E6%9C%8D%E5%8A%A1%E5%99%A8/image_1dddob062mneld118tto8uge3u.png

然后执行 service bind9 restart 重启 bind9 DNS 服务器,其他电脑就可以通过 markdown.com 来访问了。

/ubuntu%E6%90%AD%E5%BB%BA%E5%86%85%E7%BD%91dns%E6%9C%8D%E5%8A%A1%E5%99%A8/image_1dddoc8an1268a71vgs9steav4b.png

修改 /etc/bind 时可能没有权限,可以通过命令行切换到 bind 目录,然后执行sudo chmod -R a+r *sudo chmod -R a+w *为所有文件以及子目录中文件赋予读写权限。可以使用sublime 本编辑软件新建和保存文件,免去权限操作麻烦。

参考资料

  1. ubuntu搭建内网dns服务器
  2. macOS上安装DNS服务-dnsmasq
警告
本文最后更新于 2017年2月1日,文中内容可能已过时,请谨慎参考。