目录

Tensorflow-Serving-on-Kubernetes

概述

TensorFlow Serving is a flexible, high-performance serving system for machine learning models, designed for production environments.

在 Tensorflow 给的官方例子中 Use TensorFlow Serving with Kubernetes,是将模型拷贝到镜像里的,这里是会有点不太灵活,因为更新模型就要重新构建镜像,并且再去更新对应的 Pod。

由于 Tensorflow Serving 本身就提供了滚动更新模型的能力,而 TenC 提供的 Ceph 存储可以让 Tensorflow Serving 通过 S3 来直接读取模型文件。

关于 Demo,希望大家可以通过 Amazon S3 Tools Usage,了解一下 s3cmd 的用法,在 TenC 环境中,可以通过 hub.oa.com/public/s3cmd:latest 镜像来操作 Ceph 存储里的文件。

这个简单的 Demo 可以在这里找到: tensorflow-serving

Practice

在 Kubernetes 上通过 Workload 来部署模型,和随时更新模型,需要提前准备下面的材料。

  1. Serving 镜像
  2. 模型文件和 s3cmd 的环境

Serving镜像

Serving 镜像可以在 Tensorflow Serving 官方的镜像仓库获取。选择镜像的时候,务必注意是否为 GPU 版本。然后 tag 为自己的镜像仓库。

1
2
3
4
5
6
# 拉取官方镜像
docker pull tensorflow/serving
# 重新tag镜像
docker tag tensorflow/serving:latest hub.oa.com/runzhliu/serving:latest
# push到自己的镜像仓库
docker push hub.oa.com/runzhliu/serving:latest

模型文件和s3cmd环境

这是 tensorflow/serving 提供的例子。模型所在的地址在这里

1
2
3
4
5
6
7
8
.
└── 00000123
    ├── assets
    │   └── foo.txt
    ├── saved_model.pb
    └── variables
        ├── variables.data-00000-of-00001
        └── variables.index

由于目前 TenC Ceph 存储只允许上传单个文件,此处的操作方式是先打包这个模型文件夹,再上传,通过 Volumes 挂载到 Jobflow 的 Pod 上,然后在 Pod 里面解压,最后通过 s3cmd put 来递归上传整个模型文件夹。

假设大家对 s3cmd 有所了解了,可以在 TenC 上部署的 s3cmd 环境。如果需要访问项目下面的 bucket,需要 Access keySecret key,可以按照下图的方式找到项目对应的 Ceph 存储的两个 Key。

/tensorflow-serving-on-kubernetes/img.png

关于 s3cmd 环境的部署可以参考 S3_CMD 这个 Jobflow,本文不赘述了,等节点运行起来之后,登录容器再进行下列操作。

1
s3cmd put --recursive --access_key=runzhliu-demo-08ff2955 --secret_key=runzhliu-demo-b4068ecf --no-ssl --host=shradosgw.cephrados.so.db:7480 resnet_v2_fp32_savedmodel_NHWC_jpg s3://runzhliu__demo/Tensorflow_Serving/

部署Workload

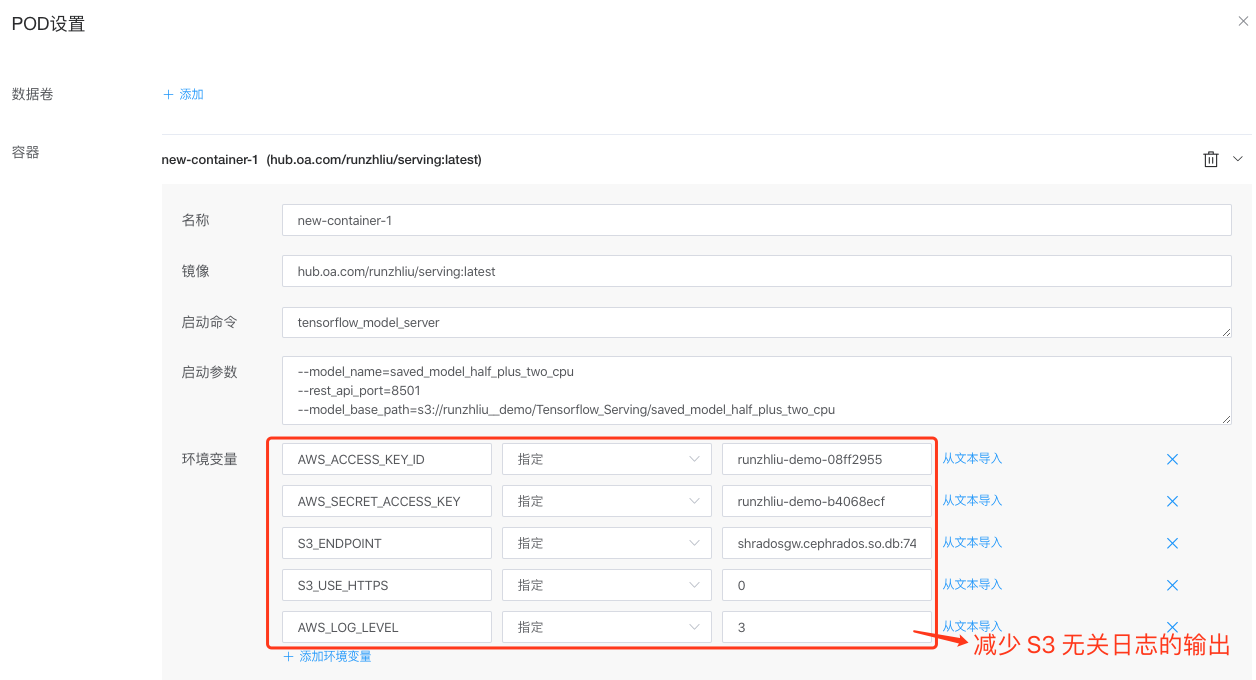
这里需要在创建 Workload 的时候,传入跟 Tensorflow 与 S3 相关的几个环节变量,否则 Serving 是无法加载 S3 的模型。

1
2
3
4
5
# key 可以从上面的内容 Ceph 存储 Ceph Key 模块找到
export AWS_ACCESS_KEY_ID=runzhliu-demo-key
export AWS_SECRET_ACCESS_KEY=runzhliu-demo-secret
export S3_ENDPOINT=9.25.151.xxx:7480
export S3_USE_HTTPS=0     
/tensorflow-serving-on-kubernetes/img_1.png

更新模型

这里测试的更新方式是直接上传一个 version 更大的模型文件夹。然后再通过 s3cmd put 上传到 Ceph 存储。

 1
 2
 3
 4
 5
 6
 7
 8
 9
10
11
12
13
14
15
.
|-- 00000123 // 原来的模型
|   |-- assets
|   |   `-- foo.txt
|   |-- saved_model.pb
|   `-- variables
|       |-- variables.data-00000-of-00001
|       `-- variables.index
`-- 00000124 // 更新后的模型
    |-- assets
    |   `-- foo.txt
    |-- saved_model.pb
    `-- variables
        |-- variables.data-00000-of-00001
        `-- variables.index

然后再通过 curl 来查看模型服务的情况,可以发现 version 为 124 的模型是 AVAILABLE 的,而 123 的模型变成 END,这是由 Serving 默认的 Version Policy 决定的,会自动加载模型版本号更大的模型。

 1
 2
 3
 4
 5
 6
 7
 8
 9
10
11
12
13
14
15
16
17
18
19
20
21
# curl http://172.17.91.182:8501/v1/models/saved_model_half_plus_two_cpu
{
 "model_version_status": [
  {
   "version": "124",
   "state": "AVAILABLE",
   "status": {
    "error_code": "OK",
    "error_message": ""
   }
  },
  {
   "version": "123",
   "state": "END",
   "status": {
    "error_code": "OK",
    "error_message": ""
   }
  }
 ]
}

测试

下面我们通过几个简单的 curl 请求来测试一下我们部署的 tensorflow-serving Workload。测试的环境可以参考 Serving_Curl

 1
 2
 3
 4
 5
 6
 7
 8
 9
10
11
12
13
14
15
16
17
18
/ # curl http://6.16.240.189:8501/v1/models/saved_model_half_plus_two_cpu
{
 "model_version_status": [
  {
   "version": "123",
   "state": "AVAILABLE",
   "status": {
    "error_code": "OK",
    "error_message": ""
   }
  }
 ]
}

# curl -d '{"instances": [1.0, 2.0, 5.0]}'  -X POST http://6.16.240.189:8501/v1/models/saved_model_half_plus_two_cpu:predict
{
    "predictions": [2.5, 3.0, 4.5]
}

下面通过 curl 已经部署的 Pod IP 和 HTTP 对应的8501端口,查看部署模型的 metadata 信息,将会输出 signature_def 等信息。

  1
  2
  3
  4
  5
  6
  7
  8
  9
 10
 11
 12
 13
 14
 15
 16
 17
 18
 19
 20
 21
 22
 23
 24
 25
 26
 27
 28
 29
 30
 31
 32
 33
 34
 35
 36
 37
 38
 39
 40
 41
 42
 43
 44
 45
 46
 47
 48
 49
 50
 51
 52
 53
 54
 55
 56
 57
 58
 59
 60
 61
 62
 63
 64
 65
 66
 67
 68
 69
 70
 71
 72
 73
 74
 75
 76
 77
 78
 79
 80
 81
 82
 83
 84
 85
 86
 87
 88
 89
 90
 91
 92
 93
 94
 95
 96
 97
 98
 99
100
101
102
103
104
105
106
107
108
109
110
111
112
113
114
115
116
117
118
119
120
121
122
123
124
125
126
127
128
129
130
131
132
133
134
135
136
137
138
139
140
141
142
143
144
145
146
147
148
149
150
151
152
153
154
155
156
157
158
159
160
161
162
163
164
165
166
167
168
169
170
171
172
173
174
175
176
177
178
179
180
181
182
183
184
185
186
187
188
189
190
191
192
# curl http://6.16.240.189:8501/v1/models/saved_model_half_plus_two_cpu/versions/123/metadata
{
"model_spec":{
 "name": "saved_model_half_plus_two_cpu",
 "signature_name": "",
 "version": "123"
}
,
"metadata": {"signature_def": {
 "signature_def": {
  "regress_x_to_y2": {
   "inputs": {
    "inputs": {
     "dtype": "DT_STRING",
     "tensor_shape": {
      "dim": [],
      "unknown_rank": true
     },
     "name": "tf_example:0"
    }
   },
   "outputs": {
    "outputs": {
     "dtype": "DT_FLOAT",
     "tensor_shape": {
      "dim": [
       {
        "size": "-1",
        "name": ""
       },
       {
        "size": "1",
        "name": ""
       }
      ],
      "unknown_rank": false
     },
     "name": "y2:0"
    }
   },
   "method_name": "tensorflow/serving/regress"
  },
  "classify_x_to_y": {
   "inputs": {
    "inputs": {
     "dtype": "DT_STRING",
     "tensor_shape": {
      "dim": [],
      "unknown_rank": true
     },
     "name": "tf_example:0"
    }
   },
   "outputs": {
    "scores": {
     "dtype": "DT_FLOAT",
     "tensor_shape": {
      "dim": [
       {
        "size": "-1",
        "name": ""
       },
       {
        "size": "1",
        "name": ""
       }
      ],
      "unknown_rank": false
     },
     "name": "y:0"
    }
   },
   "method_name": "tensorflow/serving/classify"
  },
  "regress_x2_to_y3": {
   "inputs": {
    "inputs": {
     "dtype": "DT_FLOAT",
     "tensor_shape": {
      "dim": [
       {
        "size": "-1",
        "name": ""
       },
       {
        "size": "1",
        "name": ""
       }
      ],
      "unknown_rank": false
     },
     "name": "x2:0"
    }
   },
   "outputs": {
    "outputs": {
     "dtype": "DT_FLOAT",
     "tensor_shape": {
      "dim": [
       {
        "size": "-1",
        "name": ""
       },
       {
        "size": "1",
        "name": ""
       }
      ],
      "unknown_rank": false
     },
     "name": "y3:0"
    }
   },
   "method_name": "tensorflow/serving/regress"
  },
  "serving_default": {
   "inputs": {
    "x": {
     "dtype": "DT_FLOAT",
     "tensor_shape": {
      "dim": [
       {
        "size": "-1",
        "name": ""
       },
       {
        "size": "1",
        "name": ""
       }
      ],
      "unknown_rank": false
     },
     "name": "x:0"
    }
   },
   "outputs": {
    "y": {
     "dtype": "DT_FLOAT",
     "tensor_shape": {
      "dim": [
       {
        "size": "-1",
        "name": ""
       },
       {
        "size": "1",
        "name": ""
       }
      ],
      "unknown_rank": false
     },
     "name": "y:0"
    }
   },
   "method_name": "tensorflow/serving/predict"
  },
  "regress_x_to_y": {
   "inputs": {
    "inputs": {
     "dtype": "DT_STRING",
     "tensor_shape": {
      "dim": [],
      "unknown_rank": true
     },
     "name": "tf_example:0"
    }
   },
   "outputs": {
    "outputs": {
     "dtype": "DT_FLOAT",
     "tensor_shape": {
      "dim": [
       {
        "size": "-1",
        "name": ""
       },
       {
        "size": "1",
        "name": ""
       }
      ],
      "unknown_rank": false
     },
     "name": "y:0"
    }
   },
   "method_name": "tensorflow/serving/regress"
  }
 }
}
}
}

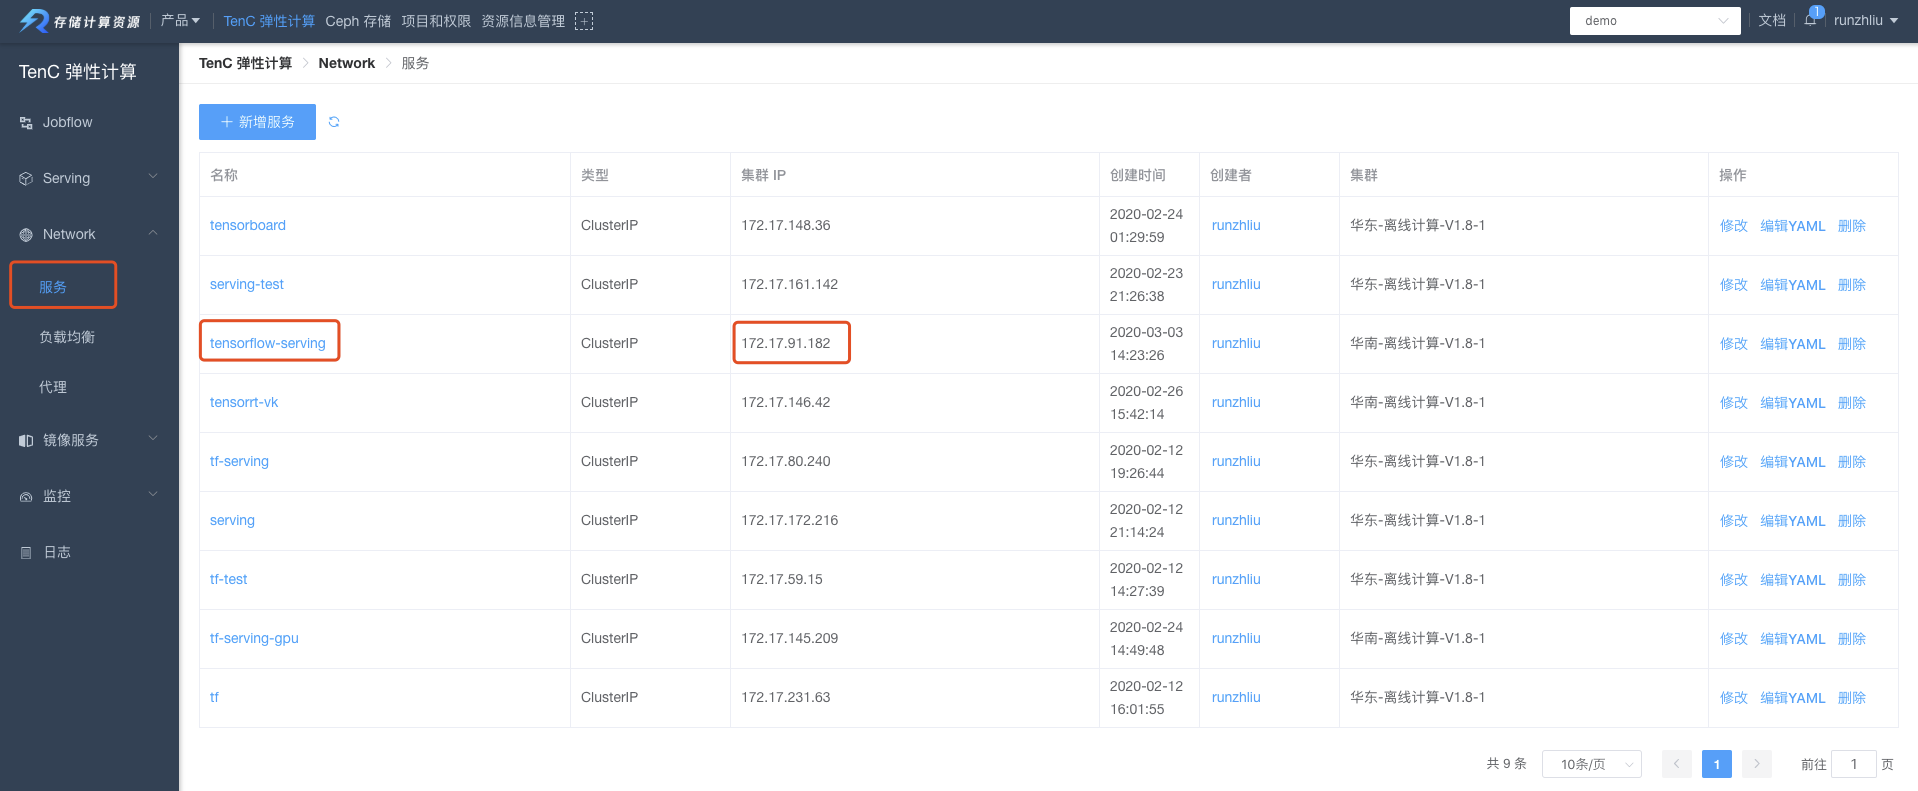
可以通过 Serving Pod 对应的 Serving 的 name 和集群 IP 来请求结果,分别是 tensorflow-serving172.17.91.182 见下图。所以就算更新了 Pod,Pod IP 变化了,通过上述两种方法,依然可以路由到 serving 的服务。

 1
 2
 3
 4
 5
 6
 7
 8
 9
10
11
12
13
14
15
16
17
18
19
20
21
22
23
24
25
26
27
# curl http://tensorflow-serving:8501/v1/models/saved_model_half_plus_two_cpu
{
 "model_version_status": [
  {
   "version": "123",
   "state": "AVAILABLE",
   "status": {
    "error_code": "OK",
    "error_message": ""
   }
  }
 ]
}

# curl http://172.17.91.182:8501/v1/models/saved_model_half_plus_two_cpu
{
 "model_version_status": [
  {
   "version": "123",
   "state": "AVAILABLE",
   "status": {
    "error_code": "OK",
    "error_message": ""
   }
  }
 ]
}

img_2

总结

目前通过 Workload 来部署 Tensorflow Serving 还是非常便利的,同时通过 S3 来管理模型,也提供了滚动更新模型的能力。

参考资料

  1. Use TensorFlow Serving with Kubernetes
  2. Train and serve a TensorFlow model with TensorFlow Serving
  3. tensorflow/serving
  4. TensorFlow on S3
  5. Tensorflow Serving RESTful API
  6. Amazon S3 Tools Usage
警告
本文最后更新于 2017年2月1日,文中内容可能已过时,请谨慎参考。