概述
本文一起来了解一下 runc 配置的一些编译相关的操作。
编译环境
编译环境如下。
1
2
3
4
5
6
|
# uname -a
Linux VM-16-15-centos 3.10.0-1160.11.1.el7.x86_64 #1 SMP Fri Dec 18 16:34:56 UTC 2020 x86_64 x86_64 x86_64 GNU/Linux
# go/bin/go version
go version go1.16.11 linux/amd64
# git rev-parse HEAD
45c31f9e1f143f61733cc1357911e3a847870f21
|
要注意,这个 commit id 的 runc 至少需要 go 1.16 来编译的,之前我的版本是 go 1.15 所以编译失败了。下面是编译过程,过程是比较丝滑的,没什么问题。
1
2
|
# make
go build -trimpath "-buildmode=pie" -tags "seccomp" -ldflags "-X main.gitCommit=v1.0.0-417-g45c31f9 -X main.version=1.0.0+dev " -o runc
|
按照官网提示进行安装。
1
2
|
# make install
install -D -m0755 runc /usr/local/sbin/runc
|
然后想执行一下单元测试,但是报错了,仔细看一下报错信息,报错信息很清晰了,这个报错有经验的应该能猜到是 docker 版本太低了。
1
2
3
4
5
6
|
# make test
docker build -t runc_dev:master .
Sending build context to Docker daemon  43.3 MB
Step 1/17 : ARG GO_VERSION=1.17
Please provide a source image with `from` prior to commit
make: *** [runcimage] 错误 1
|
确实太低了,这是 yum 源安装的,所以这里更新一下就好了。
 1
 2
 3
 4
 5
 6
 7
 8
 9
10
11
12
13
14
15
16
17
18
19
|
# docker version
Client:
 Version:         1.13.1
 API version:     1.26
 Package version: docker-1.13.1-208.git7d71120.el7_9.x86_64
 Go version:      go1.10.3
 Git commit:      7d71120/1.13.1
 Built:           Mon Jun  7 15:36:09 2021
 OS/Arch:         linux/amd64

Server:
 Version:         1.13.1
 API version:     1.26 (minimum version 1.12)
 Package version: docker-1.13.1-208.git7d71120.el7_9.x86_64
 Go version:      go1.10.3
 Git commit:      7d71120/1.13.1
 Built:           Mon Jun  7 15:36:09 2021
 OS/Arch:         linux/amd64
 Experimental:    false
|
docker 升级的方法可以参考官网,十分详细。
1
2
3
4
5
|
 sudo yum install -y yum-utils
 sudo yum-config-manager \
    --add-repo \
    https://download.docker.com/linux/centos/docker-ce.repo
sudo yum install docker-ce docker-ce-cli containerd.io
|
docker 升级完后,make test 就正常了。
1
2
3
4
5
6
7
|
# make test
docker build  -t runc_dev:master .
Sending build context to Docker daemon   43.3MB
Step 1/17 : ARG GO_VERSION=1.17
Step 2/17 : ARG BATS_VERSION=v1.3.0
Step 3/17 : ARG LIBSECCOMP_VERSION=2.5.2
Step 4/17 : FROM golang:${GO_VERSION}-bullseye
|
运行单测
下面是 Makefile 的一部分,分析一下单测的启动流程,方便以后做 runc 源码的深入分析。
 1
 2
 3
 4
 5
 6
 7
 8
 9
10
11
|
test: unittest integration rootlessintegration

unittest: runcimage
	$(CONTAINER_ENGINE) run $(CONTAINER_ENGINE_RUN_FLAGS) \
		-t --privileged --rm \
		-v /lib/modules:/lib/modules:ro \
		-v $(CURDIR):/go/src/$(PROJECT) \
		$(RUNC_IMAGE) make localunittest TESTFLAGS=$(TESTFLAGS)

runcimage:
	$(CONTAINER_ENGINE) build $(CONTAINER_ENGINE_BUILD_FLAGS) -t $(RUNC_IMAGE) .
|
从 Makefile 看,可以先构建运行单测的镜像。
1
2
3
|
export CONTAINER_ENGINE_BUILD_FLAGS="--network host --build-arg HTTP_PROXY=http://192.168.1.100:8082 --build-arg HTTP_PROXY=https://192.168.1.100:8082"
make test
docker build --network host -t runc_dev .
|
实际的命令会变成如下。
1
|
docker build -t runc_dev .
|
查看一下 Dockerfile。
 1
 2
 3
 4
 5
 6
 7
 8
 9
10
11
12
13
14
15
16
17
18
19
20
21
22
23
24
25
26
27
28
29
30
31
32
33
34
35
36
37
38
39
40
41
42
43
44
45
46
47
48
49
50
51
52
53
54
55
56
57
58
59
60
61
62
63
64
65
66
67
68
|
ARG GO_VERSION=1.20
ARG BATS_VERSION=v1.9.0
ARG LIBSECCOMP_VERSION=2.5.4

FROM golang:${GO_VERSION}-bullseye
ARG DEBIAN_FRONTEND=noninteractive
ARG CRIU_REPO=https://download.opensuse.org/repositories/devel:/tools:/criu/Debian_11

RUN KEYFILE=/usr/share/keyrings/criu-repo-keyring.gpg; \
    wget -nv $CRIU_REPO/Release.key -O- | gpg --dearmor > "$KEYFILE" \
    && echo "deb [signed-by=$KEYFILE] $CRIU_REPO/ /" > /etc/apt/sources.list.d/criu.list \
    && apt-get update \
    && apt-get install -y --no-install-recommends \
        build-essential \
        criu \
        gcc-aarch64-linux-gnu libc-dev-arm64-cross \
        gcc-arm-linux-gnueabi libc-dev-armel-cross \
        gcc-arm-linux-gnueabihf libc-dev-armhf-cross \
        gcc-powerpc64le-linux-gnu libc-dev-ppc64el-cross \
        gcc-s390x-linux-gnu libc-dev-s390x-cross \
        gcc-riscv64-linux-gnu libc-dev-riscv64-cross \
        curl \
        gawk \
        gcc \
        gperf \
        iptables \
        jq \
        kmod \
        pkg-config \
        python3-minimal \
        sshfs \
        sudo \
        uidmap \
    && apt-get clean \
    && rm -rf /var/cache/apt /var/lib/apt/lists/* /etc/apt/sources.list.d/*.list

# Add a dummy user for the rootless integration tests. While runC does
# not require an entry in /etc/passwd to operate, one of the tests uses
# `git clone` -- and `git clone` does not allow you to clone a
# repository if the current uid does not have an entry in /etc/passwd.
RUN useradd -u1000 -m -d/home/rootless -s/bin/bash rootless

# install bats
ARG BATS_VERSION
RUN cd /tmp \
    && git clone https://github.com/bats-core/bats-core.git \
    && cd bats-core \
    && git reset --hard "${BATS_VERSION}" \
    && ./install.sh /usr/local \
    && rm -rf /tmp/bats-core

# install libseccomp
ARG LIBSECCOMP_VERSION
COPY script/seccomp.sh script/lib.sh /tmp/script/
RUN mkdir -p /opt/libseccomp \
    && /tmp/script/seccomp.sh "$LIBSECCOMP_VERSION" /opt/libseccomp arm64 armel armhf ppc64le riscv64 s390x
ENV LIBSECCOMP_VERSION=$LIBSECCOMP_VERSION
ENV LD_LIBRARY_PATH=/opt/libseccomp/lib
ENV PKG_CONFIG_PATH=/opt/libseccomp/lib/pkgconfig

# Prevent the "fatal: detected dubious ownership in repository" git complain during build.
RUN git config --global --add safe.directory /go/src/github.com/opencontainers/runc

WORKDIR /go/src/github.com/opencontainers/runc

# Fixup for cgroup v2.
COPY script/prepare-cgroup-v2.sh /
ENTRYPOINT [ "/prepare-cgroup-v2.sh" ]
|
cgroup v2
为了适配 cgroup v2,可以看到很多函数都有类似的改动。
 1
 2
 3
 4
 5
 6
 7
 8
 9
10
11
|
func (c *linuxContainer) NotifyOOM() (<-chan struct{}, error) {
	// XXX(cyphar): This requires cgroups.
	if c.config.RootlessCgroups {
		logrus.Warn("getting OOM notifications may fail if you don't have the full access to cgroups")
	}
	path := c.cgroupManager.Path("memory")
	if cgroups.IsCgroup2UnifiedMode() {
		return notifyOnOOMV2(path)
	}
	return notifyOnOOM(path)
}
|
runc调用逻辑
 1
 2
 3
 4
 5
 6
 7
 8
 9
10
11
12
13
14
15
16
17
18
19
20
21
22
23
24
25
26
27
28
29
30
|
# create the top most bundle directory
mkdir /tmp/mycontainer
cd /tmp/mycontainer

# create the rootfs directory
mkdir rootfs

# export busybox via Docker into the rootfs directory
docker export $(docker create busybox) | tar -C rootfs -xvf -

runc spec
# run as root
cd /tmp/mycontainer
runc run mycontainerid

# run as root
cd /mycontainer
runc create mycontainerid

# view the container is created and in the "created" state
runc list

# start the process inside the container
runc start mycontainerid

# after 5 seconds view that the container has exited and is now in the stopped state
runc list

# now delete the container
runc delete mycontainerid
|
1
2
3
4
5
6
7
8
9
|
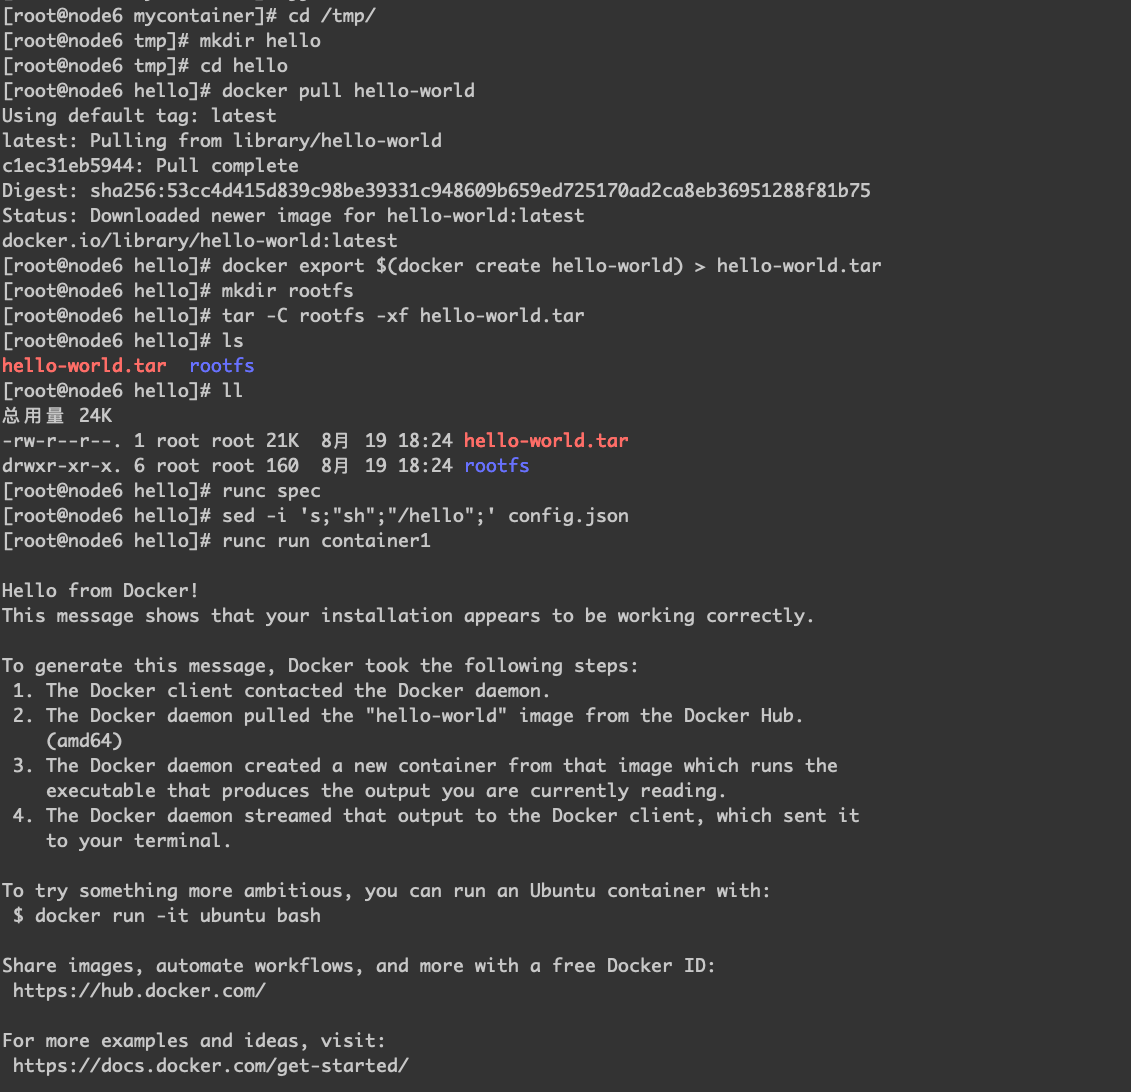
mkdir hello
cd hello
docker pull hello-world
docker export $(docker create hello-world) > hello-world.tar
mkdir rootfs
tar -C rootfs -xf hello-world.tar
runc spec
sed -i 's;"sh";"/hello";' config.json
runc run container1
|

 1
 2
 3
 4
 5
 6
 7
 8
 9
10
11
12
13
14
15
16
17
18
19
20
21
22
23
24
25
26
27
28
29
30
31
32
|
specCommand // main.go
  |- loadSpec() // /Users/oscar01.liu/workspace/personal/runc-1.1.12/spec.go
  |- Example() // /Users/oscar01.liu/workspace/personal/runc-1.1.12/libcontainer/specconv/example.go
  |- os.WriteFile(specConfig, data, 0o666)
runCommand // main.go
  |- startContainer()
    |- revisePidFile
    |- setupSpec
      |- loadSpec(specConfig) // /Users/oscar01.liu/workspace/personal/runc-1.1.12/utils.go
    |- newNotifySocket(context, os.Getenv("NOTIFY_SOCKET"), id)
    |- notifySocket.setupSpec(spec)
    |- container, err := createContainer(context, id, spec)
      |- config, err := specconv.CreateLibcontainerConfig(&specconv.CreateOpts{}) // /Users/oscar01.liu/workspace/personal/runc-1.1.12/utils_linux.go
        |- config := &configs.Config{} // /Users/oscar01.liu/workspace/personal/runc-1.1.12/libcontainer/specconv/spec_linux.go
      |- factory, err := loadFactory(context)
      |- factory.Create(id, config)
        |- validateID()
        |- os.Stat(containerRoot)
        |- cm, err := manager.New(config.Cgroups)
          |- pids, err := cm.GetAllPids()
        |- cm.GetFreezerState()
        |- os.MkdirAll(containerRoot, 0o711)
        |- os.Chown(containerRoot, unix.Geteuid(), unix.Getegid())
    |- r.run(spec.Process)
      |- r.checkTerminal(config) // /Users/oscar01.liu/workspace/personal/runc-1.1.12/utils_linux.go
      |- process, err := newProcess(*config)
      |- process.Init = r.init
      |- process.SubCgroupPaths = r.subCgroupPaths
      |- rootuid, err := r.container.Config().HostRootUID()
      |- rootgid, err := r.container.Config().HostRootGID()
      |- tty, err := setupIO(process, rootuid, rootgid, config.Terminal, detach, r.consoleSocket)
      |- status, err := handler.forward(process, tty, detach)
|
越看 runc 的源码,越发觉得,Linux 中的一切都是文件这个理念,在容器里贯彻的十分彻底。容器实际上也是一堆的文件和配置拉起来的。
layer_id的问题
layer_id 是 Docker 在创建容器时生成的唯一标识符,用于标识容器镜像层。它的决定因素包括:
1. 镜像构建
当一个 Docker 镜像通过 Dockerfile 构建时,每一层都对应一个文件系统变更。这些变更被记录,并生成一个唯一的 ID(通常为一个 SHA256 哈希值)。
2. 分层文件系统
Docker 使用分层文件系统(如 OverlayFS、AUFS)来管理镜像的层。每一层的变化都会生成一个新的 layer_id。
3. 图形驱动
layer_id 由所用的存储驱动决定,不同的存储驱动可能会有不同的层管理方式,但最终都会生成唯一的 ID。
生成方法
- SHA256哈希:
layer_id通常是使用SHA256算法对层的内容计算得到的哈希
- 与上下文相关: 内容的变化、Dockerfile的不同步骤等都会影响生成的
layer_id
查看层 ID
要查看镜像或容器的层 ID,您可以使用以下命令:
1
|
docker inspect <image_id_or_container_id>
|
在输出中,查找 GraphDriver 部分,您就可以找到所有相关的 layer_id 信息。
参考资料
- runc
警告
本文最后更新于 2024年8月20日,文中内容可能已过时,请谨慎参考。