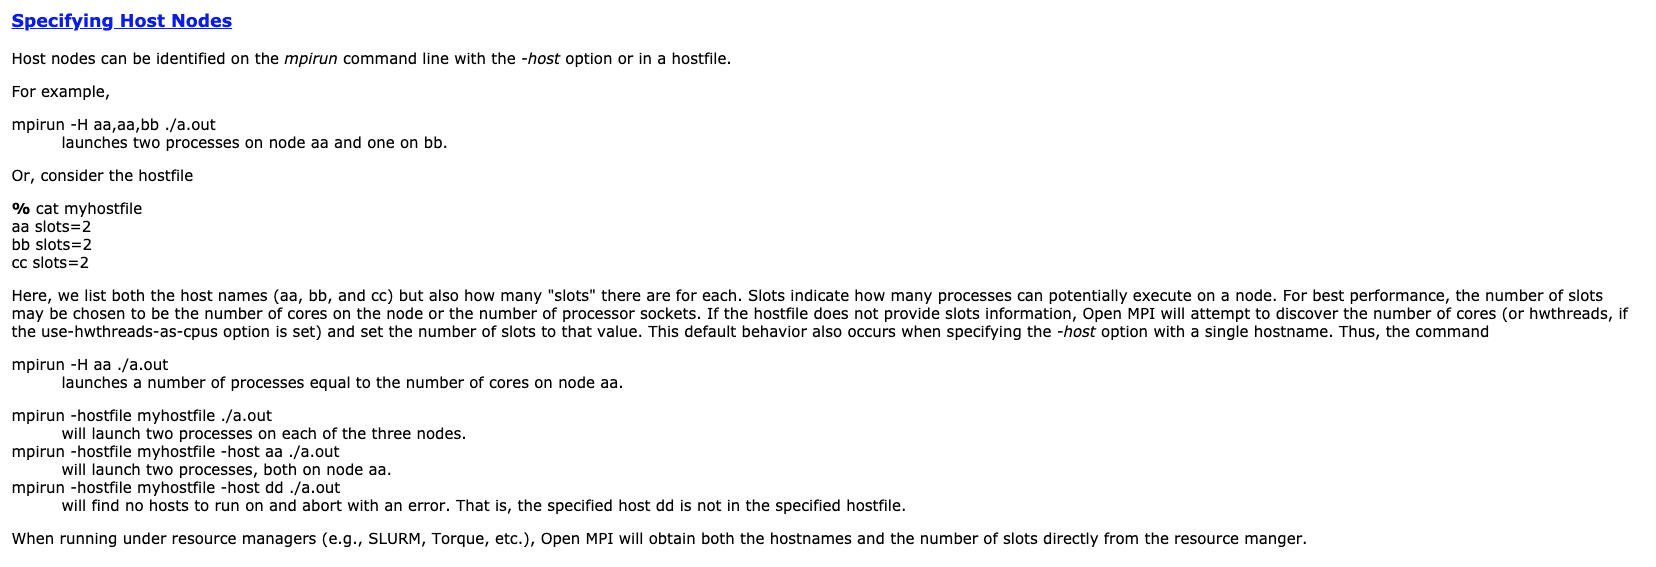
Plato和MPI计算
概述
MPI
- mpich
- mpirun
openmpi & hydra
|
|
Plato & MPI
MPI 只是一种通信协议,用于高性能并行程序的执行,可以理解成,将多个进程分发给不同的处理器去执行。Plato 原则是完全是可以单节点运行的,但是实际上,如果有 MPI 辅助,则可以变成并行计算。比较流行的 MPI 工具是 Hydra 和 OpenMPI,官方提供的例子死基于 Hydra 的,但我们对 OpenMPI 有实践经验,所以使用 OpenMPI 来运行多节点并行的 Plato。Plato 提供一些业界常见的图计算的算法。
mpiexec vs mpirun
https://cloud.tencent.com/developer/ask/94180 https://stackoverflow.com/questions/25287981/mpiexec-vs-mpirun
OpenMPI 安装
PageRank in Plato
关于 Plato 的介绍。
MPI 教程介绍
分布式计算现在对于我们来说,就跟日常生活里的手机和电脑一样普及。你很明显应该认同这个观点,因为你发现了这个了不起的 MPI 教程网站!不管你是出于什么原因想学习并行编程(parallel programming),或者说分布式编程、并行编程,也许是因为课程需要,或者是工作,或者单纯地觉得好玩,我觉得你都应该选择一项在未来几年依然十分有价值的技术去学习。我觉得「消息传递接口」(Message Passing Interface, MPI)就是这样一项技术,而且学习它确实可以让你的并行编程知识变得更深厚。尽管 MPI 比大多数并行框架要更底层(比如 Hadoop),但是学习 MPI 会为你的并行编程打下良好的基础。
在我开始介绍 MPI 之前,我想要解释下我为什么做这个教程。当我在读研究生的时候,我大量的用到了 MPI。当我在 Argonne National Laboratory 实习的时候,我很幸运地可以跟 MPI 社区里很厉害的一些人一起工作,并且使用 MPI 在庞大的超级计算(supercomputing)集群上面做了很多疯狂的事情。然而,即使有这些资源和懂行的人可以问,我还是觉得学习 MPI 是件苦差事。
对我来说学习 MPI 很难主要是因为以下三个方面。第一,网上关于 MPI 的资料几乎都是过时的,或者不那么全的。第二,我想要自己简单地搭建一个可以运行 MPI 的集群环境,但是找不到这样的教程。最后,我读研究生的时候能买到的最便宜的关于 MPI 的书要60美元 - 对研究生来说太贵了。就目前分布式编程对我们生活的重要性来说,我觉得提供一个更好的教程能让别人学习 MPI 这样一个并行编程最重要的协议同等重要。
尽管我不敢自称是 MPI 专家,我觉得以简单易读的教程形式传播这些我在研究生阶段学习到的知识还是很有意义的一件事,你可以根据教程在你自己的集群上运行 MPI 程序!我希望这个教程能对你所有帮助,也许是事业上的,也许是学习上的,或者可能是生活上的帮助 - 因为分布式编程不仅仅意味着现在,它还是未来!
MPI 的历史简介
在 90 年代之前,程序员可没我们这么幸运。对于不同的计算架构写并发程序是一件困难而且冗长的事情。当时,很多软件库可以帮助写并发程序,但是没有一个大家都接受的标准来做这个事情。
在当时,大多数的并发程序只出现在科学和研究的领域。最广为接受的模型就是消息传递模型。什么是消息传递模型?它其实只是指程序通过在进程间传递消息(消息可以理解成带有一些信息和数据的一个数据结构)来完成某些任务。在实践中,并发程序用这个模型去实现特别容易。举例来说,主进程(master process)可以通过对从进程(slave process)发送一个描述工作的消息来把这个工作分配给它。另一个例子就是一个并发的排序程序可以在当前进程中对当前进程可见的(我们称作本地的,locally)数据进行排序,然后把排好序的数据发送的邻居进程上面来进行合并的操作。几乎所有的并行程序可以使用消息传递模型来描述。
由于当时很多软件库都用到了这个消息传递模型,但是在定义上有些微小的差异,这些库的作者以及一些其他人为了解决这个问题就在 Supercomputing 1992 大会上定义了一个消息传递接口的标准- 也就是 MPI。这个标准接口使得程序员写的并发程序可以在所有主流的并发框架中运行。并且允许他们可以使用当时已经在使用的一些流行库的特性和模型。
到 1994 年的时候,一个完整的接口标准定义好了(MPI-1)。我们要记住 MPI 只是一个接口的定义而已。然后需要程序员去根据不同的架构去实现这个接口。很幸运的是,仅仅一年之后,一个完整的 MPI 实现就已经出现了。在第一个实现之后,MPI 就被大量地使用在消息传递应用程序中,并且依然是写这类程序的标准(de-facto)。
MPI 对于消息传递模型的设计
在开始教程之前,我会先解释一下 MPI 在消息传递模型设计上的一些经典概念。第一个概念是通讯器(communicator)。通讯器定义了一组能够互相发消息的进程。在这组进程中,每个进程会被分配一个序号,称作秩(rank),进程间显性地通过指定秩来进行通信。
通信的基础建立在不同进程间发送和接收操作。一个进程可以通过指定另一个进程的秩以及一个独一无二的消息标签(tag)来发送消息给另一个进程。接受者可以发送一个接收特定标签标记的消息的请求(或者也可以完全不管标签,接收任何消息),然后依次处理接收到的数据。类似这样的涉及一个发送者以及一个接受者的通信被称作点对点(point-to-point)通信。
当然在很多情况下,某个进程可能需要跟所有其他进程通信。比如主进程想发一个广播给所有的从进程。在这种情况下,手动去写一个个进程点对点的信息传递就显得很笨拙。而且事实上这样会导致网络利用率低下。MPI 有专门的接口来帮我们处理这类所有进程间的集体性(collective)通信。
把点对点通信和集体性通信这两个机制合在一起已经可以创造十分复杂的并发程序了。事实上,这两个功能已经强大到我现在不需要再介绍任何 MPI 高级的特性了,我会把那些放到后面的教程中。现在,我们可以从在单机上安装 MPI或 启动一个 Amazon EC2 MPI 集群 开始我们的 MPI 旅途了!如果你已经把 MPI 装好了,那太好了,直接开始这个MPI Hello World 课程吧。
Installing MPICH2 on a Single Machine
MPI is simply a standard which others follow in their implementation. Because of this, there are a wide variety of MPI implementations out there. One of the most popular implementations, MPICH2, will be used for all of the examples provided through this site. Users are free to use any implementation they wish, but only instructions for installing MPICH2 will be provided. Furthermore, the scripts and code provided for the lessons are only guaranteed to execute and run with the lastest version of MPICH2.
MPI 其实就是一个通信协议标准,不同的软件实现都是基于这个标准来做的。因此,业界有很多优秀的实现,其中一个最流行的实现是 MPICH2,本教程所有的例子都会使用这个软件库。用户当然可以使用其他实现,比如 OpenMPI,等等,但是本教程只会提供简单的安装指引。此外,所有脚本和示例程序都只保证可以运行最新版本的 MPICH2。
MPICH2 is a widely-used implementation of MPI that is developed primarily by Argonne National Laboratory in the United States. The main reason for choosing MPICH2 over other implementations is simply because of my familiarity with the interface and because of my close relationship with Argonne National Laboratory. I also encourage others to check out OpenMPI, which is also a widely-used implementation.
Installing MPICH2
The latest version of MPICH2 is available here. The version that I will be using for all of the examples on the site is 1.4, which was released June 16, 2011. Go ahead and download the source code, uncompress the folder, and change into the MPICH2 directory.
|
|
Once doing this, you should be able to configure your installation by performing ./configure. I added a couple of parameters to my configuration to avoid building the MPI Fortran library. If you need to install MPICH2 to a local directory (for example, if you don’t have root access to your machine), type ./configure --prefix=/installation/directory/path For more information about possible configuration parameters, type ./configure --help
|
|
When configuration is done, it should say “Configuration completed.” Once this is through, it is time to build and install MPICH2 with make; sudo make install.
|
|
If your build was successful, you should be able to type mpiexec --version and see something similar to this.
|
|
Hopefully your build finished successfully. If not, you may have issues with missing dependencies. For any issue, I highly recommend copying and pasting the error message directly into Google.
Up next Now that you have built MPICH2 locally, you have some options of where you can proceed on this site. If you already have the hardware and resources to setup a local cluster, I suggest you proceed to the tutorial about running an MPI cluster in LAN. If you don’t have access to a cluster or want to learn more about building a virtual MPI cluster, check out the lesson about building and running your own cluster on Amazon EC2. If you have built a cluster in either way or simply want to run the rest of the lessons from your machine, proceed to the MPI hello world lesson, which provides an overview of the basics of programming and running your first MPI program.
关于mpich和hydra的关系
Examples
openmpi 和 mpich 是有点参数的区别的。
|
|
plato pagerank
|
|
通过 OMPI_MCA_orte_default_hostfile 来设置环境变量。
mpich 和 openmpi 的方式不太一样。在使用 hostfile 的时候,配置有点区别。
不一定要用 ssh 的。
这个命令是OK的。
|
|
有几个需要注意的,launcher-exec 其实只是通过 rsh 传递命令,所以文件必须每个 Pod 都有。
|
|
基本上就是一些 Java 目录下的 PATH 配置的问题。
|
|
|
|
|
|
Plato 暂时不支持 on GPU。好像可以诶。
参考资料:
- https://blog.zhesih.com/2019/01/19/mpi-operator/
- https://wiki.mpich.org/mpich/index.php/Using_the_Hydra_Process_Manager
- https://www.open-mpi.org/faq/?category=running
- https://github.com/kubeflow/community/blob/master/proposals/mpi-operator-proposal.md
利用MPI Operator在K8S集群运行Plato的PageRank Example
关于 Plato 的相关信息,可以参考 Github 开源的版本。
简单来说,Plato 是一个图计算的框架,内置一些常用的图计算算法,如果对 Spark 比较熟悉,应该就不会对 Plato 感到太陌生。
本文主要介绍一下 MPI 和 MPI Operator 以及如何利用 MPI Operator 在 K8S 部署一个 Plato PageRank 的任务。
虽然官网是推荐使用 mpich,但是我对 OpenMPI 更为熟悉一点,而且 MPI Operator 是默认用了 OpenMPI 的库的,所以这里运行 Plato 分布式计算的时候,也是用的 OpenMPI。
MPI 重要概念
- communicator: 通讯器,定义了一组能够相互发消息的进程
- rank: 秩,每个进程被分配的一个序号,进程间显性通过指定秩来进行通信
- tag: 标签,一个进程可以通过制定另一个进程的秩以及一个独一无二的消息标签来发送消息给另一个进程
- point-to-point: 点对点通信,一个发送者一个接收者
- collective: 集体性通信,某个进程发送一个广播给所有的从进程
- broadcast: 广播,是标准的集体通信技术之一
- MPI_Scatter: 给每个进程发送的是一个数组的一部分数据
- MPI_Gather: 从多个进程收集数据到一个进程
- MPI_ALLgather: 多对多通信模式
翻译: https://mpitutorial.com/tutorials/performing-parallel-rank-with-mpi/
在之前的课程里,我们了解了 MPI_Scatter, MPI_Gather 和 MPI_Allgather。本文将继续在基础的 collective 通信模式下,继续讲述,如何通过 MPI 的工具链,来实现一个有用的方法,这个方法就是并且排序。
注意 - 我们网站的所有的代码都在 Github 上,这部分的代码在 tutoials/performing-parallel-rank-with-mpi/code 下。
并行排序 - 问题的描述
当每个进程都讲一个数组里的一个数字存储在本地的存储了,如果能够知道自己的数字在所有的进程包含的数据集合里的排位,这是挺有意义且重要的。例如,用户可能想知道一个 MPI 集群里,相对来说,是哪个处理器或者进程处理速度更快。这个信息可以用来调度任务或者做其他事情。但是正如你可以想象,这是相对比较复杂的,以为要知道一个数字在所有进程包含的数字中的大小顺序。这个问题 - 并行排序 - 就是我们这节课需要解释的问题。
一个并行排序的 Input 和 Output
Dynamic Receiving with MPI Probe (and MPI Status)
在前面的课程里,我们讨论了如何使用 MPI_Send 和 MPI_Recv 来实现标准的点对点通信模型。我只介绍到了在消息长度已知的情况下应该如何发送消息。尽管将消息长度单独作为消息来 send/recv 是可能的,MPI 原生支持通过一些额外的函数调用来实现动态消息的收发。我将会在本节课中展开介绍如何调用这些方法。
Note - All of the code for this site is on GitHub. This tutorial’s code is under tutorials/dynamic-receiving-with-mpi-probe-and-mpi-status/code.