概述
在公有云的 GPU 机器上尝试运行 DeepSpeed 的代码。
训练解析
还是用 PyTorch 来训练的。
安装环境
  1
  2
  3
  4
  5
  6
  7
  8
  9
 10
 11
 12
 13
 14
 15
 16
 17
 18
 19
 20
 21
 22
 23
 24
 25
 26
 27
 28
 29
 30
 31
 32
 33
 34
 35
 36
 37
 38
 39
 40
 41
 42
 43
 44
 45
 46
 47
 48
 49
 50
 51
 52
 53
 54
 55
 56
 57
 58
 59
 60
 61
 62
 63
 64
 65
 66
 67
 68
 69
 70
 71
 72
 73
 74
 75
 76
 77
 78
 79
 80
 81
 82
 83
 84
 85
 86
 87
 88
 89
 90
 91
 92
 93
 94
 95
 96
 97
 98
 99
100
101
102
103
104
105
106
107
108
109
110
111
112
113
114
115
116
117
118
119
120
121
|
# 安装conda
wget https://repo.continuum.io/miniconda/Miniconda3-latest-Linux-x86_64.sh
# 静默安装不需要交互
sh Miniconda3-latest-Linux-x86_64.sh -b
cp /root/miniconda3/bin/conda /usr/local/bin/
source ~/.bashrc
conda -V

# 卸载
rm -rf /usr/local/miniconda/
rm -rf /usr/local/anaconda/

# 环境
conda create -n chatgpt python=3.8 -y
conda create -n chatgpt python=3.10.9 -y
conda create -n jittorllms python=3.10.9 -y
conda init
source ~/.bashrc
conda activate chatgpt

# 如果在家里的服务器需要配置代理
export HTTP_PROXY=127.0.0.1:8081
export HTTPS_PROXY=127.0.0.1:8081

# 腾讯云环境问题
yum install -y centos-release-scl git
yum install -y devtoolset-8-gcc*
scl enable devtoolset-8 bash
conda activate chatgpt
gcc -v

# deepspeed相关,耗时较长,默认都会走腾讯云的源
pip install -i https://mirrors.cloud.tencent.com/pypi/simple deepspeed
pip install deepspeed

# 下载example代码
git clone https://github.com/microsoft/DeepSpeedExamples.git
cd DeepSpeedExamples/applications/DeepSpeed-Chat/
pip install -r requirements.txt -i https://mirrors.cloud.tencent.com/pypi/simple

# 测试代码
python train.py --actor-model facebook/opt-1.3b --reward-model facebook/opt-350m --deployment-type single_node

# 另开一个窗口,查看日志
tail -f /root/DeepSpeedExamples/applications/DeepSpeed-Chat/output/actor-models/1.3b/training.log

# 查看GPU利用率
watch -n 0.1 -d nvidia-smi

# 内存问题
cat > /root/DeepSpeedExamples/applications/DeepSpeed-Chat/training/step1_supervised_finetuning/training_scripts/single_node/run_1.3b.sh <<"EOF"
#!/bin/bash
# Copyright (c) Microsoft Corporation.
# SPDX-License-Identifier: Apache-2.0

# DeepSpeed Team
OUTPUT=$1
ZERO_STAGE=$2
if [ "$OUTPUT" == "" ]; then
    OUTPUT=./output
fi
if [ "$ZERO_STAGE" == "" ]; then
    ZERO_STAGE=2
fi
mkdir -p $OUTPUT

deepspeed main.py \
   --data_path Dahoas/rm-static Dahoas/full-hh-rlhf Dahoas/synthetic-instruct-gptj-pairwise yitingxie/rlhf-reward-datasets openai/webgpt_comparisons stanfordnlp/SHP \
   --data_split 2,4,4 \
   --model_name_or_path facebook/opt-1.3b \
   --per_device_train_batch_size 2 \
   --per_device_eval_batch_size 2 \
   --max_seq_len 512 \
   --learning_rate 9.65e-6 \
   --weight_decay 0.1 \
   --num_train_epochs 2 \
   --gradient_accumulation_steps 1 \
   --lr_scheduler_type cosine \
   --num_warmup_steps 0 \
   --seed 1234 \
   --zero_stage $ZERO_STAGE \
   --deepspeed \
   --gradient_checkpointing \
   --output_dir $OUTPUT \
   &> $OUTPUT/training.log
EOF
python train.py --actor-model facebook/opt-1.3b --reward-model facebook/opt-350m --deployment-type single_node
python train.py --actor-model facebook/opt-13b --reward-model facebook/opt-350m --deployment-type single_node

# 特殊single_gpu才能跑起来!
python train.py --actor-model facebook/opt-1.3b --reward-model facebook/opt-350m --deployment-type single_gpu

# 缓存文件
mkdir cache
cp -r /root/.cache/* cache/

# 通过dok部署Kubernetes集群
export secretId=
export secretKey=
unalias cp rm mv

# 下载安装包
cd || exit
wget -q -c https://github.com//tencentyun/coscli/releases/download/v0.11.0-beta/coscli-linux
chmod 755 coscli-linux
mv coscli-linux /usr/local/bin/coscli
cat >/root/.cos.yaml <<EOF
cos:
  base:
    secretid: ${secretId}
    secretkey: ${secretKey}
    sessiontoken: ""
    protocol: https
  buckets:
  - name: dok-1258329892
    alias: dok-1258329892
    region: ""
    endpoint: cos.ap-singapore.myqcloud.com
EOF
coscli cp cos://dok-1258329892/cache-ds.zip .
unzip cache-ds.zip
|
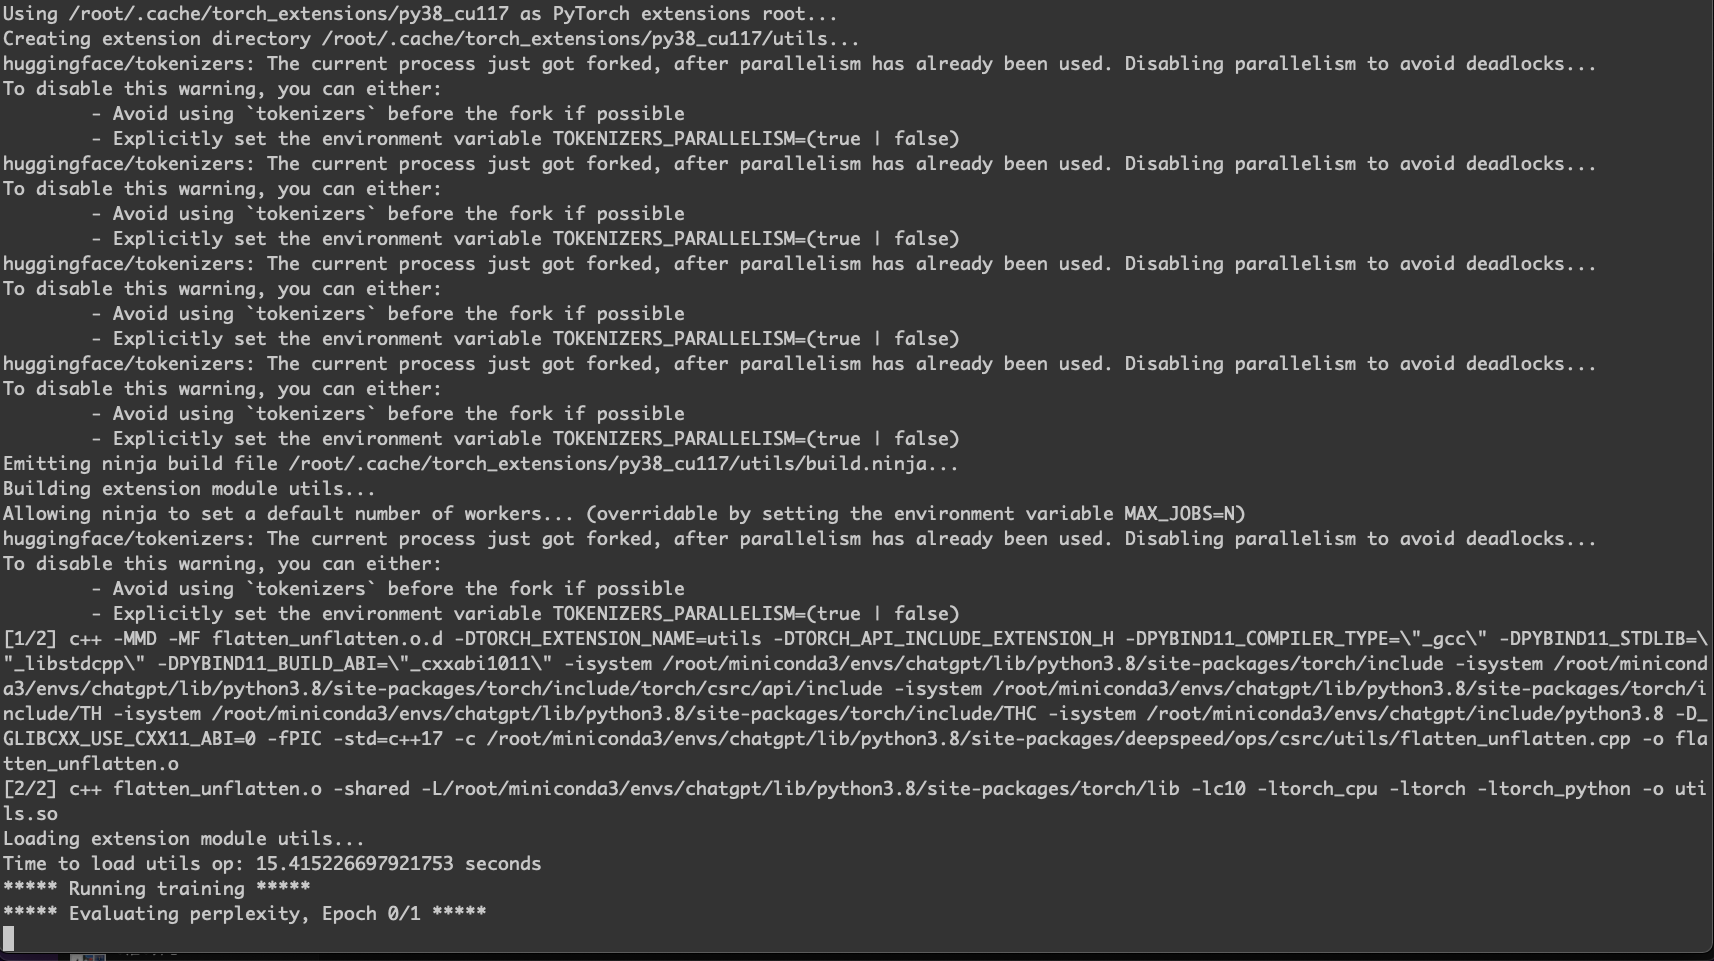
正常训练的日志如下。
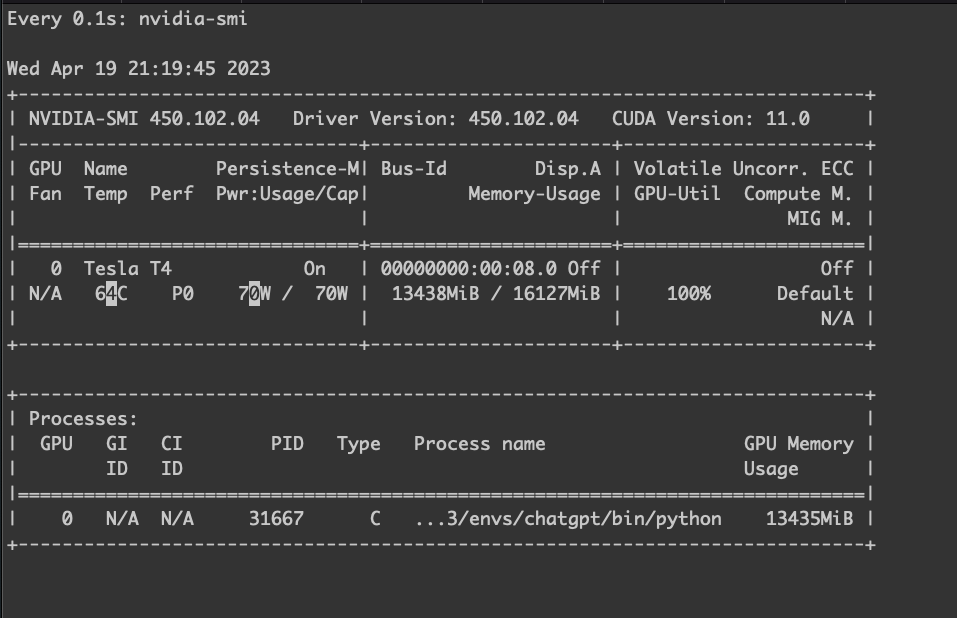
 .
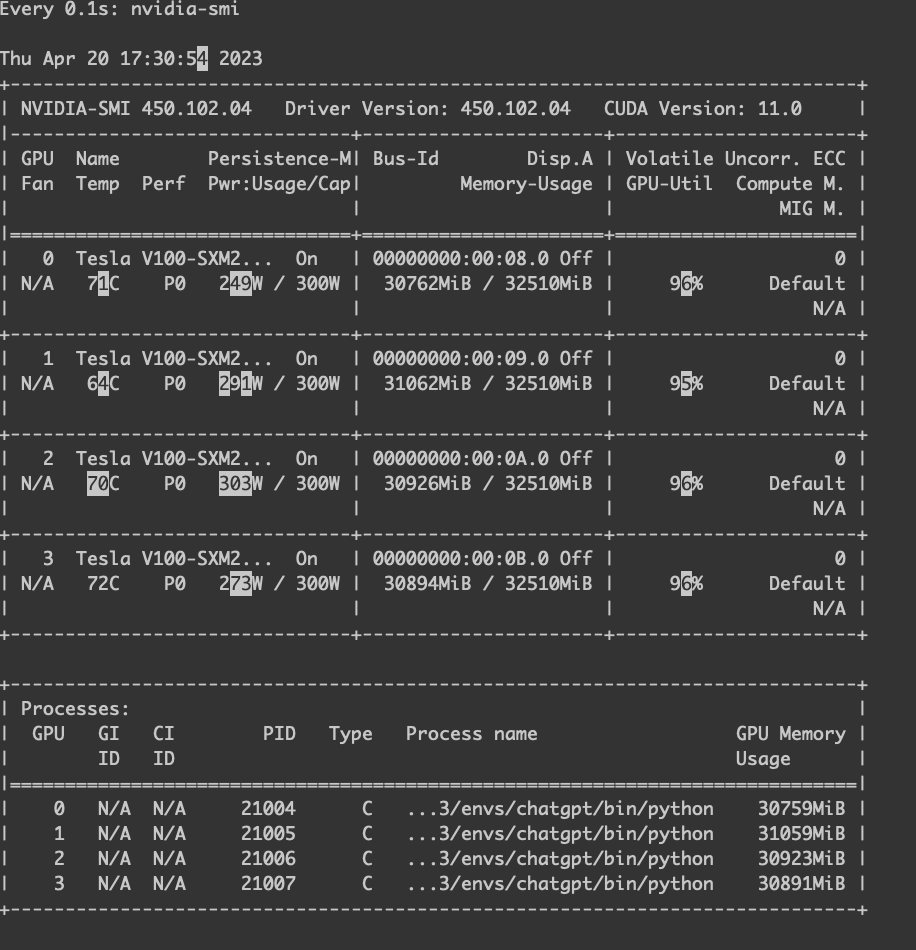
GPU 使用率。
.
GPU 使用率。
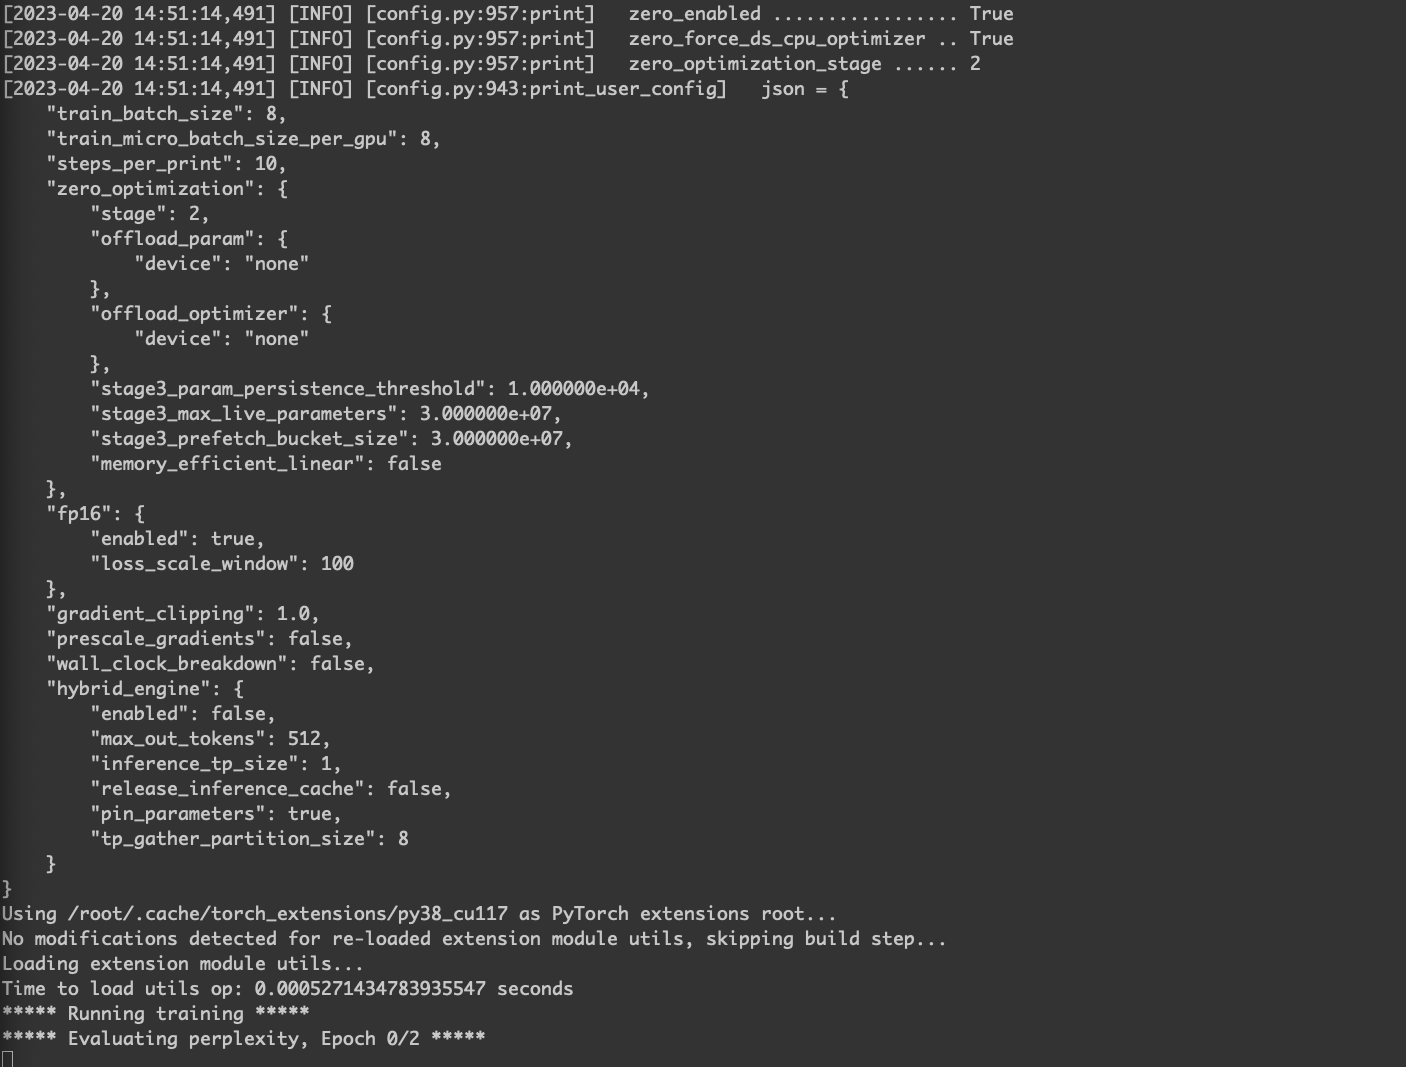
关键需要通过自己的语料进行训练,参考这里。
V100
正常训练。
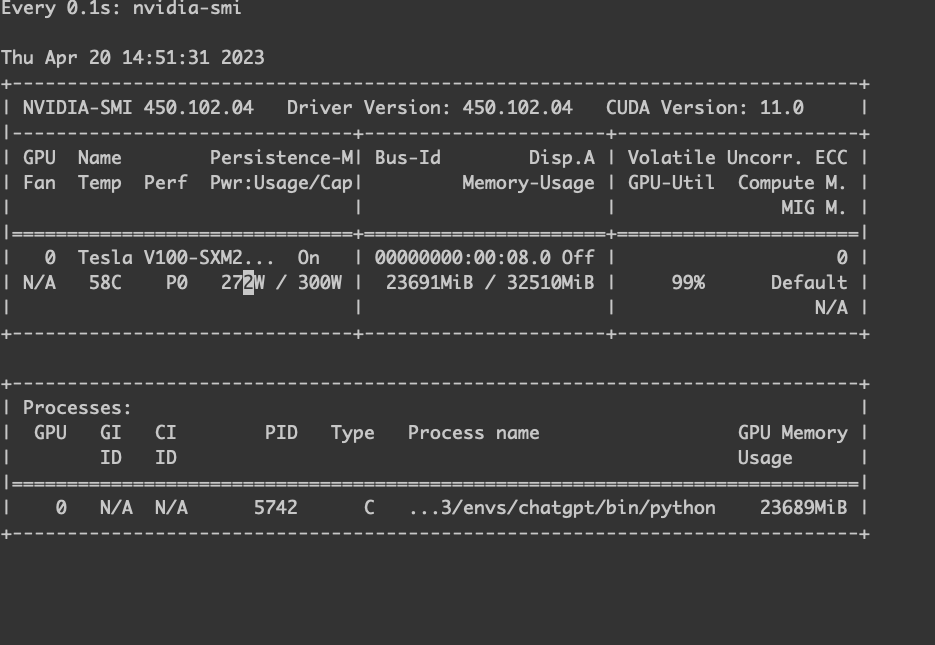
GPU 使用率。
一机多卡
- CentOS 7.9 64位
- 160GB
- 40核
- 40Mbps
- 4 * NVIDIA V100
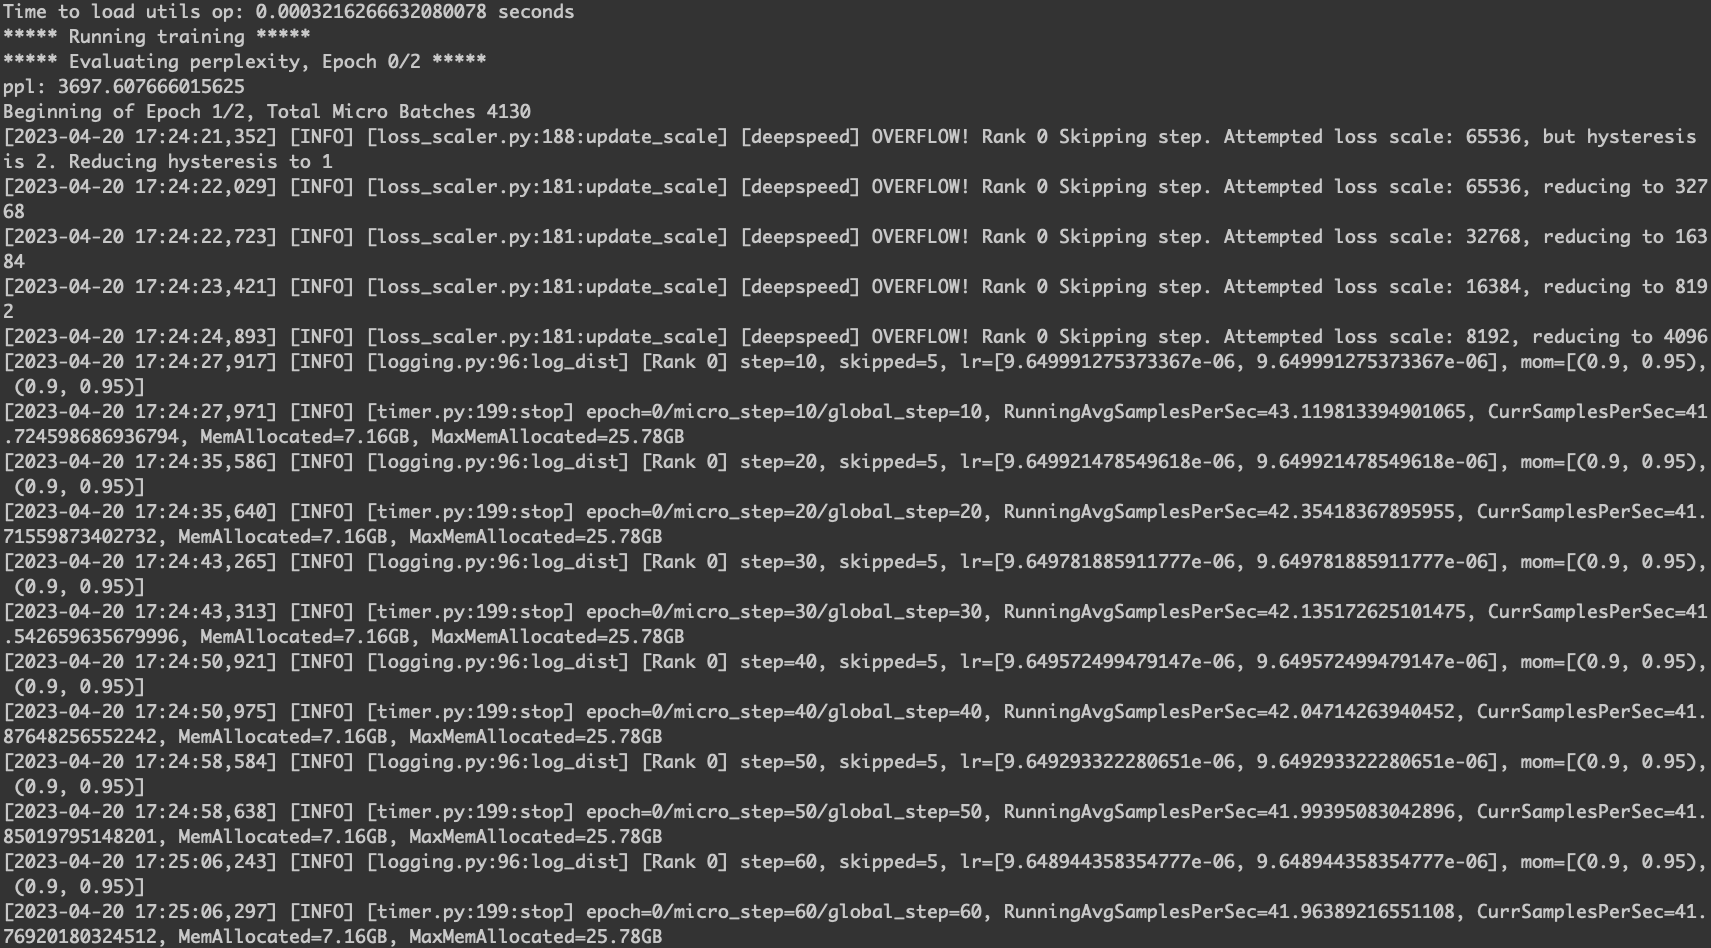
马力全开的训练。
1
2
|
python train.py --actor-model facebook/opt-1.3b --reward-model facebook/opt-350m --deployment-type single_node
python train.py --actor-model facebook/opt-13b --reward-model facebook/opt-350m --deployment-type single_node
|
多机多卡
1
|
TimeoutError: The client socket has timed out after 1800s while trying to connect to (10.99.211.55, 29500).
|
很明显,这个是因为对端机器没连上,有可能是两段环境不一致导致的。
TroubleShooting
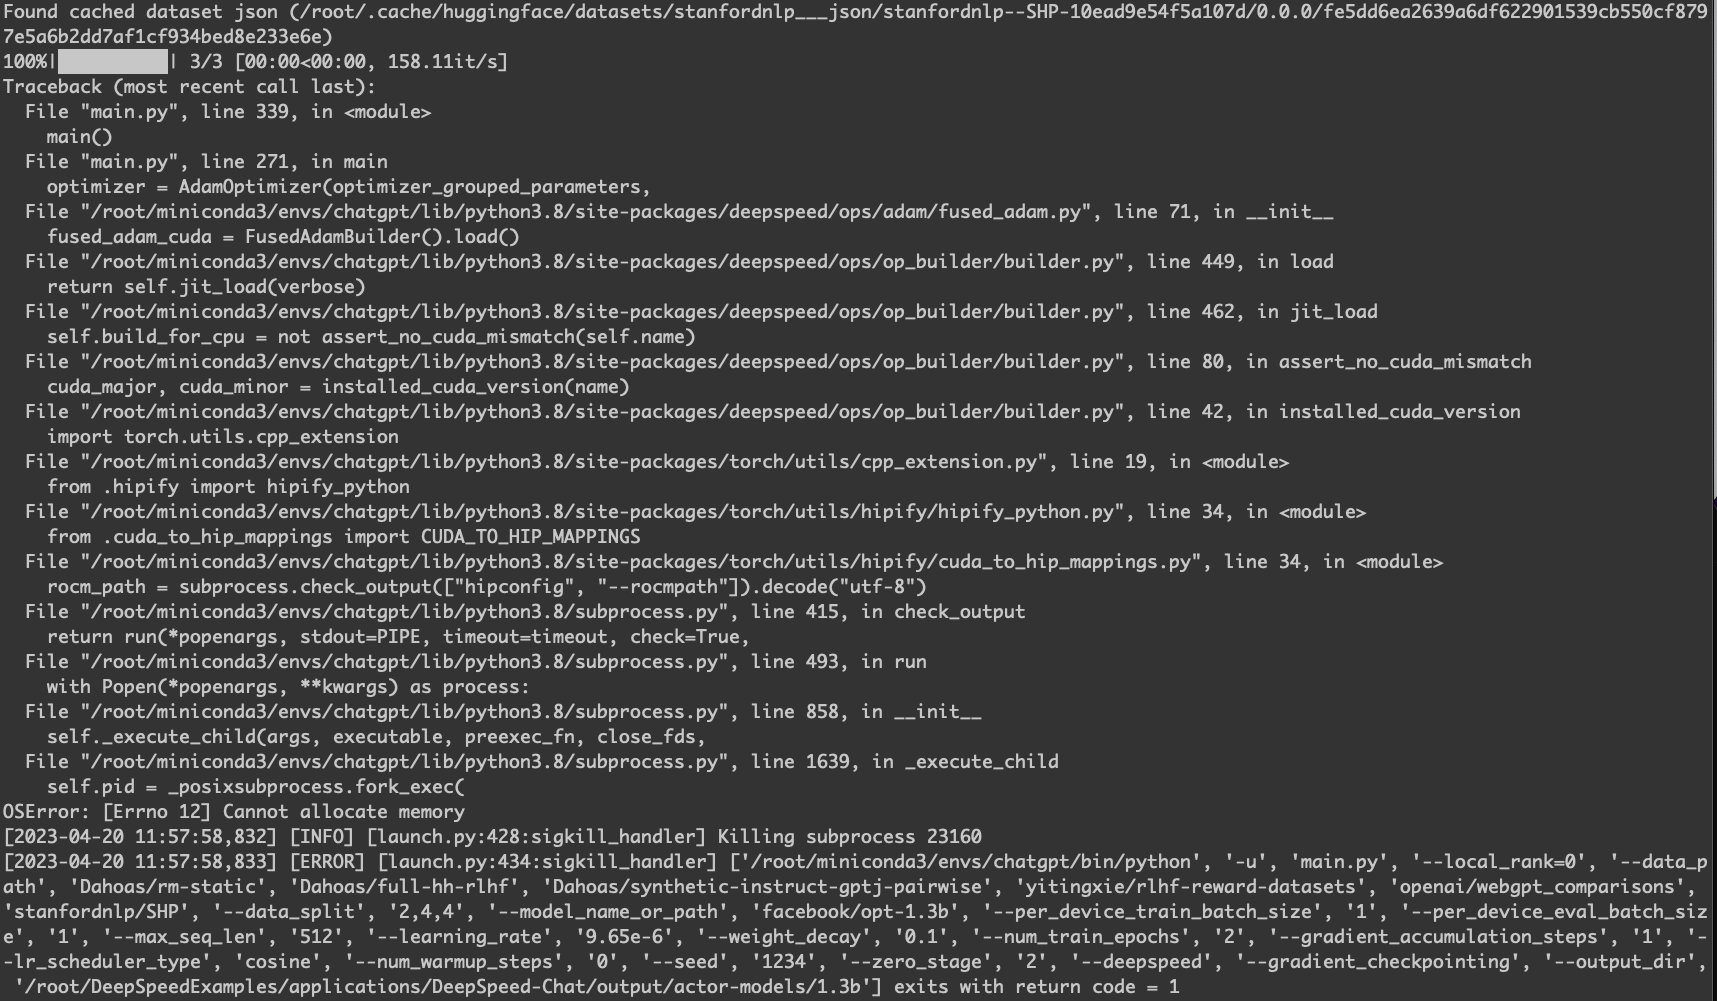
Cannot allocate memory
1
|
echo 1 > /proc/sys/vm/overcommit_memory
|
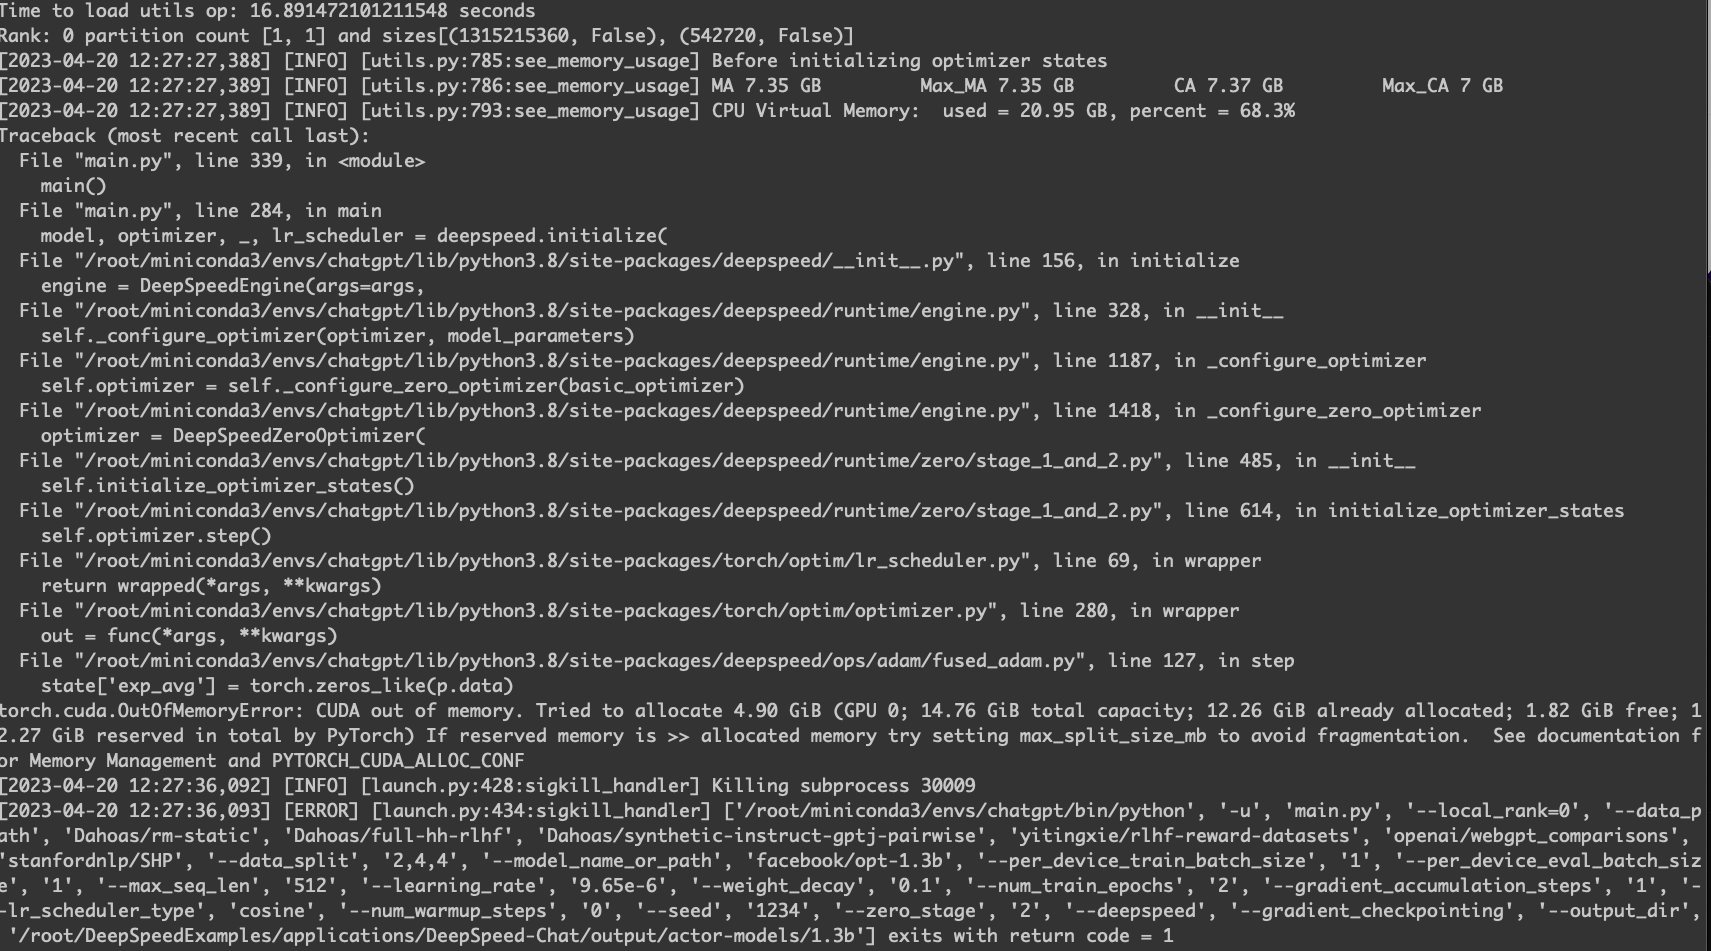
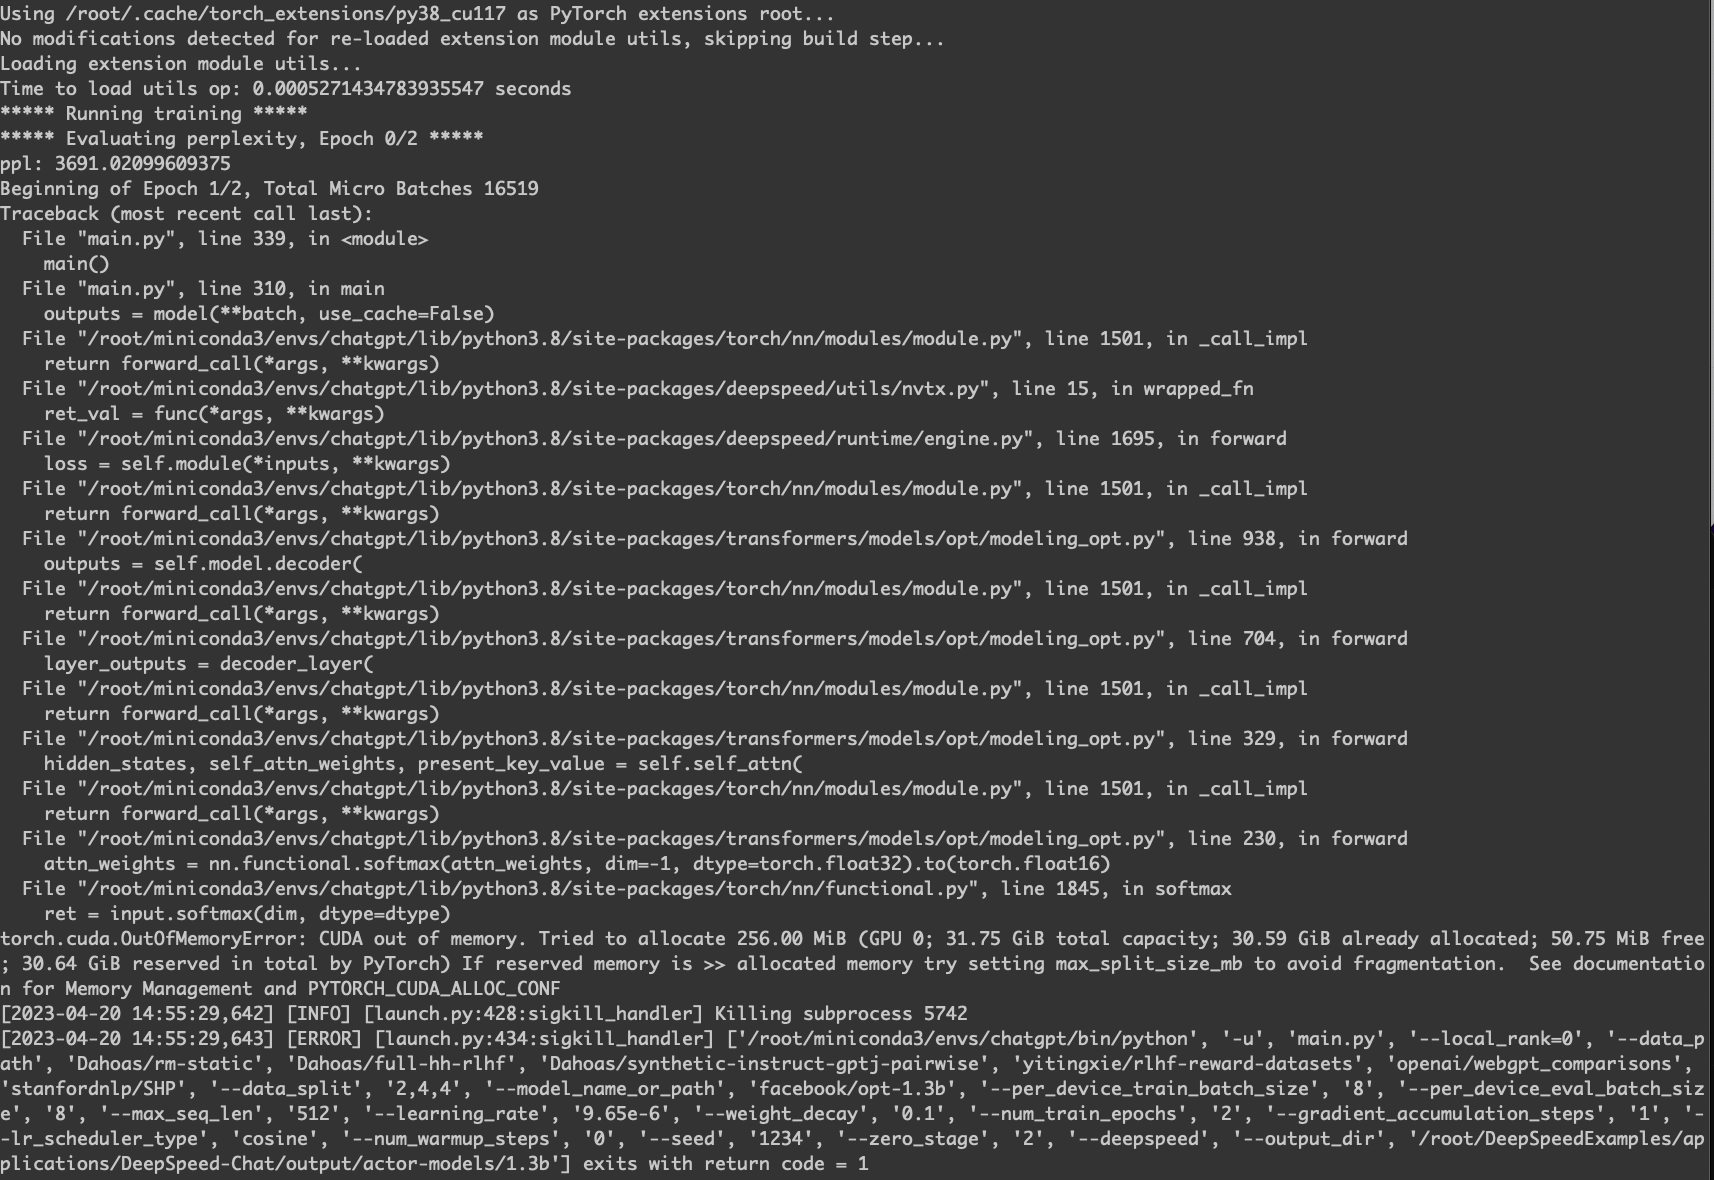
torch.cuda.OutOfMemoryError: CUDA out of memory
V100 下依然会有显存不够的情况。
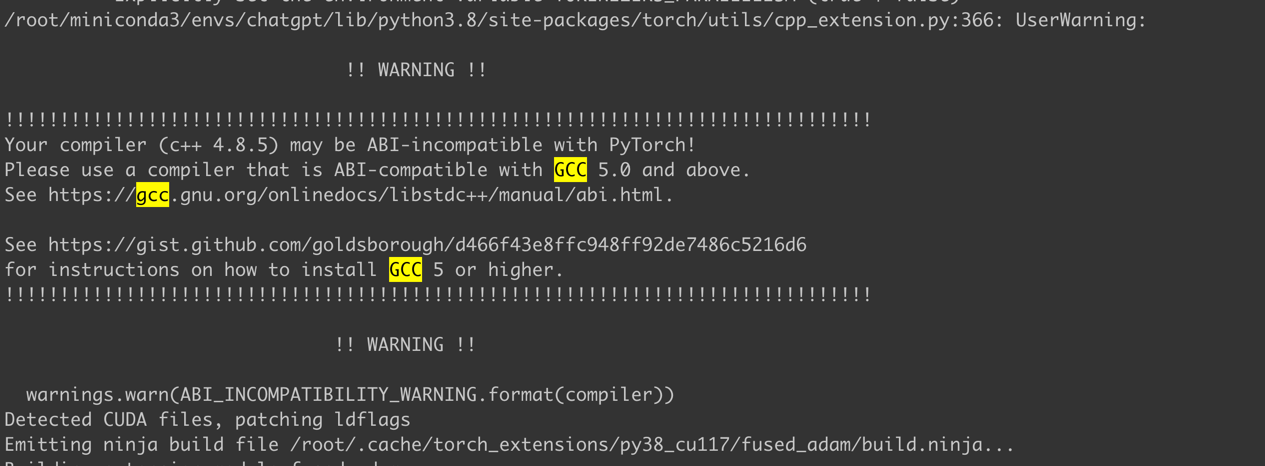
gcc问题
一般升级就好。
1
2
|
gcc --version
yum install devtoolset-8-gcc*
|
警告
本文最后更新于 2023年7月12日,文中内容可能已过时,请谨慎参考。
 .
GPU 使用率。
.
GPU 使用率。