概述
本文主要测试一下 Flannel 已经作为主要的 CNI 部署的情况下,通过部署 cilium-chain,让容器具有网络观测的能力。
- 测试kube-proxy替代
- 测试cni-chaining
部署
Flannel配置
推荐使用 host-gw 方式来测试,部署 Flannel 的时候需要修改一下配置,这里的关键配置是 net-conf.json 里的 Backend 参数,需要修改成 host-gw。
 1
 2
 3
 4
 5
 6
 7
 8
 9
10
11
12
13
14
15
16
17
18
19
20
21
22
23
24
25
26
27
28
29
30
31
32
33
34
35
36
|
kind: ConfigMap
apiVersion: v1
metadata:
  name: kube-flannel-cfg
  namespace: kube-system
  labels:
    tier: node
    app: flannel
data:
  cni-conf.json: |
    {
      "name": "cbr0",
      "cniVersion": "0.3.1",
      "plugins": [
        {
          "type": "flannel",
          "delegate": {
            "hairpinMode": true,
            "isDefaultGateway": true
          }
        },
        {
          "type": "portmap",
          "capabilities": {
            "portMappings": true
          }
        }
      ]
    }
  net-conf.json: |
    {
      "Network": "10.244.0.0/16",
      "Backend": {
        "Type": "host-gw"
      }
    }
|
修改完之后重新发布 Flannel,查看路由修改是否有效,因为本文不是对 Flannel 的分析,所以简单的介绍一下。
 1
 2
 3
 4
 5
 6
 7
 8
 9
10
11
12
13
14
|
# 修改前,都是通过flannel.1来路由
default via 192.168.1.1 dev eno1 proto static metric 100
10.244.0.0/24 via 10.244.0.0 dev flannel.1 onlink
10.244.1.0/24 dev cni0 proto kernel scope link src 10.244.1.1
10.244.3.0/24 via 10.244.3.0 dev flannel.1 onlink
172.17.0.0/16 dev docker0 proto kernel scope link src 172.17.0.1 linkdown
192.168.1.0/24 dev eno1 proto kernel scope link src 192.168.1.202 metric 100
# 修改后,就直接通过物理网卡来做路由
default via 192.168.1.1 dev eno1 proto static metric 100
10.244.0.0/24 via 192.168.1.200 dev eno1
10.244.1.0/24 dev cni0 proto kernel scope link src 10.244.1.1
10.244.3.0/24 via 192.168.1.201 dev eno1
172.17.0.0/16 dev docker0 proto kernel scope link src 172.17.0.1 linkdown
192.168.1.0/24 dev eno1 proto kernel scope link src 192.168.1.202 metric 100
|
cilium-chain配置
下面是在 Flannel 的基础上,部署 cilium-chain 的过程。
 1
 2
 3
 4
 5
 6
 7
 8
 9
10
11
12
13
14
15
16
17
18
19
20
21
22
23
24
25
26
27
28
29
30
31
32
33
34
35
36
37
38
39
40
41
42
43
44
45
46
47
48
49
50
51
52
53
54
55
56
57
58
59
60
|
# 最好先备份kube-proxy
k delete ds kube-proxy
k delete cm kube-proxy
k delete svc kubernetes -n default
# 每个节点
iptables-save | grep -v KUBE | iptables-restore
ipvsadm -D -t 10.96.0.1:443
# 安装cilium-chain
helm repo add cilium https://helm.cilium.io/
helm pull cilium/cilium --version 1.14.4
tar zxvf cilium-1.14.4.tgz
cd cilium
# cni-configuration需要部署
cat <<EOF | kubectl apply -f -
apiVersion: v1
kind: ConfigMap
metadata:
  name: cni-configuration
  namespace: kube-system
data:
  cni-config: |-
    {
      "name": "generic-veth",
      "cniVersion": "0.3.1",
      "plugins": [
        {
          "type": "flannel",
          "delegate": {
            "hairpinMode": true,
            "isDefaultGateway": true
          }
        },
        {
          "type": "cilium-cni"
        }
      ]
    }
EOF
# helm get values cilium
autoDirectNodeRoutes: true
bpf:
  hostLegacyRouting: false
  masquerade: true
cni:
  chainingMode: none
hubble:
  relay:
    enabled: true
  ui:
    enabled: true
ipv4NativeRoutingCIDR: 10.0.0.0/8
k8sServiceHost: 192.168.1.200
k8sServicePort: 6443
kubeProxyReplacement: strict
operator:
  replicas: 1
routingMode: native
# 为了部署cilium-chain,下面几个参数是必须的
helm install cilium . --version 1.14.4 --namespace=kube-system --set cni.chainingMode=generic-veth --set cni.customConf=true --set cni.configMap=cni-configuration --set routingMode=native --set enableIPv4Masquerade=false --set k8sServiceHost=192.168.1.200 --set k8sServicePort=6443
helm install cilium . --version 1.14.4 --namespace=kube-system --set cni.chainingMode=generic-veth --set cni.customConf=true --set cni.configMap=cni-configuration --set routingMode=native --set enableIPv4Masquerade=false --set k8sServiceHost=10.189.212.92 --set k8sServicePort=6443 --set hubble.relay.enabled=true --set hubble.ui.enabled=true
|
注意上面这个 configmap 实际上会在每个节点的目录 /etc/cni/net.d/ 下生成下面的文件。
 1
 2
 3
 4
 5
 6
 7
 8
 9
10
11
12
13
14
15
16
17
|
# cat 05-cilium.conflist
{
  "name": "generic-veth",
  "cniVersion": "0.3.1",
  "plugins": [
    {
      "type": "flannel",
      "delegate": {
        "hairpinMode": true,
        "isDefaultGateway": true
      }
    },
    {
      "type": "cilium-cni"
    }
  ]
}
|
另外 Helm 命令安装的时候,对应的参数如下。
 1
 2
 3
 4
 5
 6
 7
 8
 9
10
|
# helm get values cilium
USER-SUPPLIED VALUES:
cni:
  chainingMode: generic-veth
  configMap: cni-configuration
  customConf: true
enableIPv4Masquerade: false
k8sServiceHost: 192.168.1.200
k8sServicePort: 6443
routingMode: native
|
部署完之后,可以看到 Cilium 相关的 Pod 都启动了,然后可以看到启动之后,CoreDNS 的 Pod 会立刻重启,目的是为存量的容器创建 cilium-chain 下对应的的 eBPF 程序。
1
2
3
4
5
6
7
8
9
|
[root@master cilium]# k get pods -o wide
NAME                               READY   STATUS              RESTARTS   AGE   IP              NODE
cilium-d4tw8                       0/1     Running             0          25s   192.168.1.200   master
cilium-operator-6dcf5cdc6f-nkj2g   1/1     Running             0          25s   192.168.1.201   node1
cilium-operator-6dcf5cdc6f-sjlb9   1/1     Running             0          25s   192.168.1.202   node2
cilium-tjnz2                       0/1     Running             0          25s   192.168.1.202   node2
cilium-vbc59                       1/1     Running             0          25s   192.168.1.201   node1
coredns-74ff55c5b-d7ltz            0/1     ContainerCreating   0          3s    <none>          node1
coredns-74ff55c5b-gdzqw            1/1     Terminating         0          15d   10.244.1.2      node2
|
查看日志,当安装完 cilium-chain 之后,endpoint 包括容器的 veth 会重建,并且被 cilium-agent 附着上了 eBPF 的程序。
 1
 2
 3
 4
 5
 6
 7
 8
 9
10
11
12
13
14
15
|
level=info msg="Create endpoint request" addressing="&{10.244.1.4   fe80::807a:4ff:fe33:2558  }" containerID=829c155460f8e3af06fd3be64fdf1c9f84a69cf73a0d63259906555f1ca3a4a2 datapathConfiguration="&{false true false true true 0xc001127c3a}" interface=veth72f16d18 k8sPodName=kube-system/nm-mp24m labels="[]" subsys=daemon sync-build=true
level=info msg="New endpoint" containerID=829c155460 datapathPolicyRevision=0 desiredPolicyRevision=0 endpointID=3120 ipv4=10.244.1.4 ipv6="fe80::807a:4ff:fe33:2558" k8sPodName=kube-system/nm-mp24m subsys=endpoint
level=info msg="Resolving identity labels (blocking)" containerID=829c155460 datapathPolicyRevision=0 desiredPolicyRevision=0 endpointID=3120 identityLabels="k8s:app=network-multitool,k8s:io.cilium.k8s.namespace.labels.kubernetes.io/metadata.name=kube-system,k8s:io.cilium.k8s.policy.cluster=default,k8s:io.cilium.k8s.policy.serviceaccount=default,k8s:io.kubernetes.pod.namespace=kube-system" ipv4=10.244.1.4 ipv6="fe80::807a:4ff:fe33:2558" k8sPodName=kube-system/nm-mp24m subsys=endpoint
level=info msg="Reusing existing global key" key="k8s:app=network-multitool;k8s:io.cilium.k8s.namespace.labels.kubernetes.io/metadata.name=kube-system;k8s:io.cilium.k8s.policy.cluster=default;k8s:io.cilium.k8s.policy.serviceaccount=default;k8s:io.kubernetes.pod.namespace=kube-system;" subsys=allocator
level=info msg="Identity of endpoint changed" containerID=829c155460 datapathPolicyRevision=0 desiredPolicyRevision=0 endpointID=3120 identity=48596 identityLabels="k8s:app=network-multitool,k8s:io.cilium.k8s.namespace.labels.kubernetes.io/metadata.name=kube-system,k8s:io.cilium.k8s.policy.cluster=default,k8s:io.cilium.k8s.policy.serviceaccount=default,k8s:io.kubernetes.pod.namespace=kube-system" ipv4=10.244.1.4 ipv6="fe80::807a:4ff:fe33:2558" k8sPodName=kube-system/nm-mp24m oldIdentity="no identity" subsys=endpoint
level=info msg="Waiting for endpoint to be generated" containerID=829c155460 datapathPolicyRevision=0 desiredPolicyRevision=0 endpointID=3120 identity=48596 ipv4=10.244.1.4 ipv6="fe80::807a:4ff:fe33:2558" k8sPodName=kube-system/nm-mp24m subsys=endpoint
level=info msg="Compiled new BPF template" BPFCompilationTime=1.084117166s file-path=/var/run/cilium/state/templates/73bcbef6260920cfb00a0de97e364d357cb1b1b36ed82f6c301db7bda0678ce1/bpf_lxc.o subsys=datapath-loader
level=info msg="Rewrote endpoint BPF program" containerID=829c155460 datapathPolicyRevision=0 desiredPolicyRevision=1 endpointID=3120 identity=48596 ipv4=10.244.1.4 ipv6="fe80::807a:4ff:fe33:2558" k8sPodName=kube-system/nm-mp24m subsys=endpoint
level=info msg="Successful endpoint creation" containerID=829c155460 datapathPolicyRevision=1 desiredPolicyRevision=1 endpointID=3120 identity=48596 ipv4=10.244.1.4 ipv6="fe80::807a:4ff:fe33:2558" k8sPodName=kube-system/nm-mp24m subsys=daemon
level=info msg="Policy Add Request" ciliumNetworkPolicy="[&{EndpointSelector:{\"matchLabels\":{\"any:app\":\"network-multitool\",\"k8s:io.kubernetes.pod.namespace\":\"kube-system\"}} NodeSelector:{} Ingress:[{IngressCommonRule:{FromEndpoints:[{\"matchLabels\":{\"any:app\":\"network-multitool\",\"k8s:io.kubernetes.pod.namespace\":\"kube-system\"}}] FromRequires:[] FromCIDR: FromCIDRSet:[] FromEntities:[] aggregatedSelectors:[]} ToPorts:[{Ports:[{Port:80 Protocol:TCP}] TerminatingTLS:<nil> OriginatingTLS:<nil> ServerNames:[] Listener:<nil> Rules:0xc0001cbce0}] ICMPs:[] Authentication:<nil>}] IngressDeny:[] Egress:[] EgressDeny:[] Labels:[k8s:io.cilium.k8s.policy.derived-from=CiliumNetworkPolicy k8s:io.cilium.k8s.policy.name=rule1 k8s:io.cilium.k8s.policy.namespace=kube-system k8s:io.cilium.k8s.policy.uid=89ffe113-74be-44ec-839e-0bc4aad53a2d] Description:Allow HTTP GET /public from env=prod to app=service}]" policyAddRequest=412f9e59-ae09-4fc2-8a03-1974f30dded4 subsys=daemon

...
...
..
level=info msg="Rewrote endpoint BPF program" containerID=829c155460 datapathPolicyRevision=1 desiredPolicyRevision=2 endpointID=3120 identity=48596 ipv4=10.244.1.4 ipv6="fe80::807a:4ff:fe33:2558" k8sPodName=kube-system/nm-mp24m subsys=endpoint
|
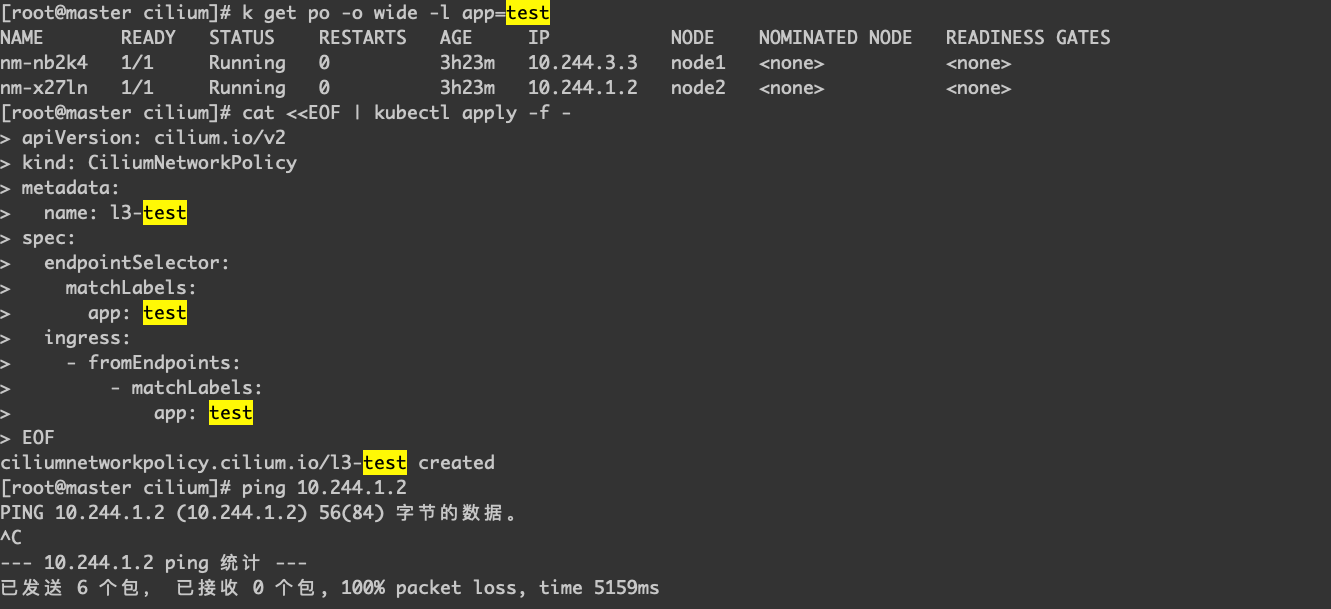
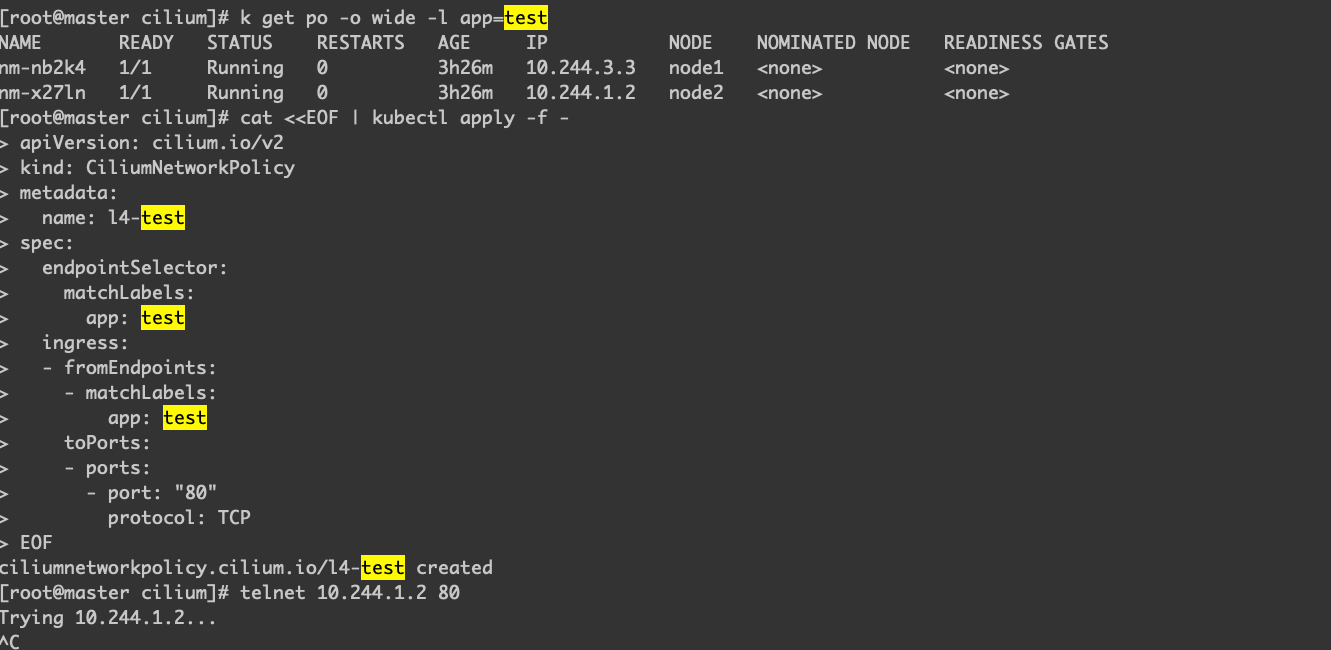
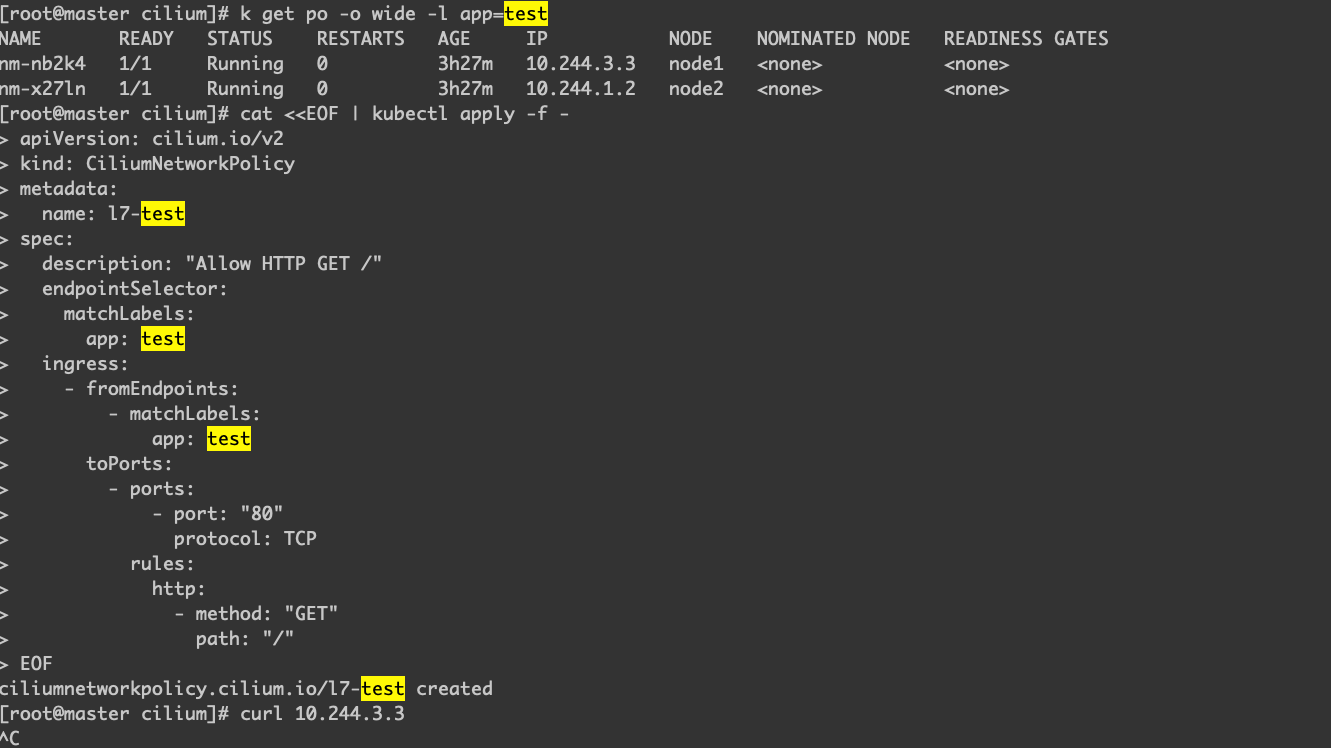
测试case
下面是分别创建3、4和7层的网络策略,为了方便测试,注意这里的所有关于 Label 的设置,都是针对 app: test。
 1
 2
 3
 4
 5
 6
 7
 8
 9
10
11
12
13
14
15
16
17
18
19
20
21
22
23
24
25
26
27
28
29
30
31
32
33
34
35
36
37
38
39
40
41
42
43
44
45
46
47
48
49
50
51
|
apiVersion: cilium.io/v2
kind: CiliumNetworkPolicy
metadata:
  name: l3-test
spec:
  endpointSelector:
    matchLabels:
      app: test
  ingress:
    - fromEndpoints:
        - matchLabels:
            app: test
---
apiVersion: cilium.io/v2
kind: CiliumNetworkPolicy
metadata:
  name: l4-test
spec:
  endpointSelector:
    matchLabels:
      app: test
  ingress:
  - fromEndpoints:
    - matchLabels:
        app: test
    toPorts:
    - ports:
      - port: "80"
        protocol: TCP
---
apiVersion: cilium.io/v2
kind: CiliumNetworkPolicy
metadata:
  name: l7-test
spec:
  description: "Allow HTTP GET /"
  endpointSelector:
    matchLabels:
      app: test
  ingress:
    - fromEndpoints:
        - matchLabels:
            app: test
      toPorts:
        - ports:
            - port: "80"
              protocol: TCP
          rules:
            http:
              - method: "GET"
                path: "/"
|
所有策略配置好之后,创建测试的 Pod,注意这里的镜像启动的时候,会启动一个 Nginx 进程,之后就会进入 sleep inf,我们的测试,可以通过进入容器之后进行,另外为了方便测试,我们通过部署 DaemonSet,在我们两个节点上都部署容器来测试跨主机的网络情况。另外为了方便测试,这里的 Label 也是设置成 app: test,这样上面创建的网络策略就会作用于这些 Pod。
 1
 2
 3
 4
 5
 6
 7
 8
 9
10
11
12
13
14
15
16
17
18
19
20
|
apiVersion: apps/v1
kind: DaemonSet
metadata:
  namespace: kube-system
  name: nm
spec:
  selector:
    matchLabels:
      app: test
  template:
    metadata:
      labels:
        app: test
    spec:
      containers:
        - name: test
          image: runzhliu/network-multitool:latest
          command: ["/bin/bash", "-c", "nginx && sleep inf"]
          securityContext:
            privileged: true
|
可以按下面的形式进行测试。
针对l3测试

针对l4测试
针对l7测试
总结
Cilium 的功能很 fancy,比如网络策略,但在某些情况下,直接用一个新的 CNI 换掉生产的旧的(运营成熟) CNI 是比较有风险的,cilium-chain 则提供了一种相对无害的方式来给存量的 Kubernetes 集群提供 Cilium 的网络策略的能力的选择。
参考资料
- 链式CNI插件与portmap端口映射
- 支持hostPort
- Cilium 1.6: 无KVstore操作、百分之百kube-proxy替换、基于套接字的负载均衡
- Tutorial: How to Use Cilium Hubble for Observability in CNI Chaining Mode (Part 1)
警告
本文最后更新于 2023年11月12日,文中内容可能已过时,请谨慎参考。