概述
为了测试 kubeadm 搭建 Kubernetes 集群访问外部 etcd 的场景,需要简单地搭建一个 etcd 服务,并且配置好 SSL 证书,可以参考下面的脚本,丝滑部署一个测试集群或者节点。
证书准备
测试环境如下。
 1
 2
 3
 4
 5
 6
 7
 8
 9
10
11
12
|
# hostname -I
192.168.1.202
# cat /etc/os-release
NAME="Anolis OS"
VERSION="8.8"
ID="anolis"
ID_LIKE="rhel fedora centos"
VERSION_ID="8.8"
PLATFORM_ID="platform:an8"
PRETTY_NAME="Anolis OS 8.8"
ANSI_COLOR="0;31"
HOME_URL="https://openanolis.cn/"
|
目标是部署单节点的 etcd 服务,因为用于测试环境,所以基本上所有配置文件都会放在 /tmp 目录,如果有需要修改,读者可以根据脚本进行修改。
 1
 2
 3
 4
 5
 6
 7
 8
 9
10
11
12
13
14
15
16
17
18
19
20
21
22
23
24
25
26
27
28
29
30
31
32
|
yum install openssl -y
# 准备CA根证书
mkdir -p /tmp/etcd/ssl/
cd /tmp/etcd/ssl/
openssl genrsa -out k8s.ca.key 2048
openssl req -x509 -new -nodes -key k8s.ca.key -subj="/CN=vip" -days 36500 -out k8s.ca.crt

cat > etcd_ssl.conf <<EOF
[req]
distinguished_name     = req_distinguished_name
extensions_name  = @v3_req

[req_distinguished_name]

[v3_req]
basicConstraints = CA:FALSE
keyUsage=digitalSignature, nonRepudiation, keyEncipherment
subjectAltName = @alt_names

[alt_names]
IP.1 = 192.168.1.202
EOF

# etcd server证书
openssl genrsa -out etcd_server.key 2048
openssl req -new -key etcd_server.key -config etcd_ssl.conf -subj="/CN=etcd-server" -out etcd_server.csr
openssl x509 -req -in etcd_server.csr -CA k8s.ca.crt -CAkey k8s.ca.key -CAcreateserial -days 36500 -extensions v3_req -extfile etcd_ssl.conf -out etcd_server.crt

# etcd client证书
openssl genrsa -out etcd_client.key 2048
openssl req -new -key etcd_client.key -config etcd_ssl.conf -subj="/CN=etcd-client" -out etcd_client.csr
openssl x509 -req -in etcd_client.csr -CA k8s.ca.crt -CAkey k8s.ca.key -CAcreateserial -days 36500 -extensions v3_req -extfile etcd_ssl.conf -out etcd_client.crt
|
安装etcd
还是跟上面制作证书类似,因为用于测试,所以会把基本所有文件都放在 /tmp 目录,请按需修改。
 1
 2
 3
 4
 5
 6
 7
 8
 9
10
11
12
13
14
15
16
17
18
19
20
21
22
23
24
25
26
27
28
29
30
31
32
33
34
35
36
37
38
39
40
41
42
43
44
45
46
47
48
49
50
51
52
53
|
# 下载etcd
cd /tmp/etcd/
# choose either URL
GOOGLE_URL=https://storage.googleapis.com/etcd
GITHUB_URL=https://github.com/etcd-io/etcd/releases/download
DOWNLOAD_URL=${GOOGLE_URL}
ETCD_VER=v3.5.16
curl -LO ${DOWNLOAD_URL}/${ETCD_VER}/etcd-${ETCD_VER}-linux-amd64.tar.gz
tar xzvf etcd-${ETCD_VER}-linux-amd64.tar.gz
rm -f etcd-${ETCD_VER}-linux-amd64.tar.gz
cd etcd-${ETCD_VER}-linux-amd64
cp etcd* /usr/bin/
cat > /usr/lib/systemd/system/etcd.service <<EOF
[Unit]
Description=etcd
Documentation=https://github.com/etcd.io/etcd
After=network.target
[Service]
EnvironmentFile=/tmp/etcd/etcd.conf
ExecStart=/usr/bin/etcd
Restart=always
[Install]
WantedBy=multi-user.target
EOF
mkdir -p /tmp/etcd/data
cat > /tmp/etcd/etcd.conf <<EOF
ETCD_NAME=etcd1
ETCD_DATA_DIR=/tmp/etcd/data
ETCD_CERT_FILE=/tmp/etcd/ssl/etcd_server.crt
ETCD_KEY_FILE=/tmp/etcd/ssl/etcd_server.key
ETCD_TRUSTED_CA_FILE=/tmp/etcd/ssl/k8s.ca.crt
ETCD_CLIENT_CERT_AUTH=true
ETCD_LISTEN_CLIENT_URLS=https://192.168.1.202:2379
ETCD_ADVERTISE_CLIENT_URLS=https://192.168.1.202:2379
ETCD_PEER_CERT_FILE=/tmp/etcd/ssl/etcd_server.crt
ETCD_PEER_KEY_FILE=/tmp/etcd/ssl/etcd_server.key
ETCD_PEER_TRUSTED_CA_FILE=/tmp/etcd/ssl/k8s.ca.crt
ETCD_LISTEN_PEER_URLS=https://192.168.1.202:2380
ETCD_INITAIL_ADVERTISE_PEER_URLS=https://192.168.1.202:2380
ETCD_INITAIL_CLUSTER_TOKEN=etcd-cluster
ETCD_INITAIL_CLUSTER="etcd1=https://192.168.1.202:2380"
ETCD_INITAIL_CLUSER_START=new
EOF
systemctl daemon-reload
systemctl restart etcd
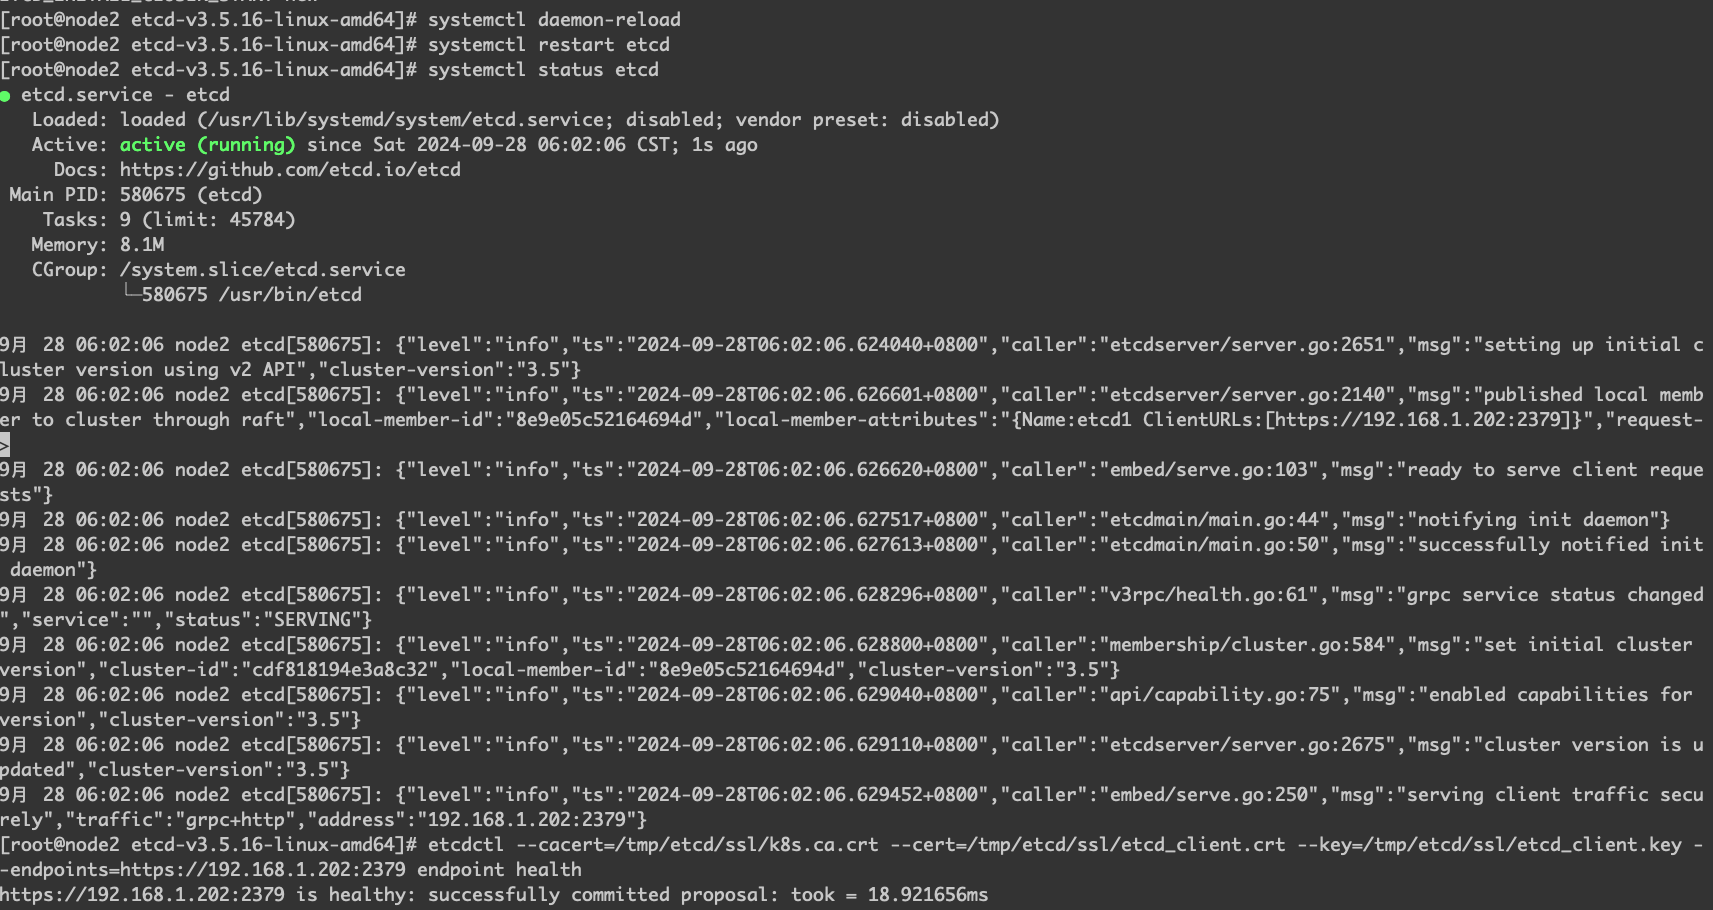
systemctl status etcd
|
部署完 etcd 之后,通过 etcdctl 来进行访问的测试。
1
2
|
# 测试
etcdctl --cacert=/tmp/etcd/ssl/k8s.ca.crt --cert=/tmp/etcd/ssl/etcd_client.crt --key=/tmp/etcd/ssl/etcd_client.key --endpoints=https://192.168.1.202:2379 endpoint health
|

参考kubeadm
kubeadm 初始化的时候,会创建 manifest 文件夹,默认情况下,etcd 可以通过静态 Pod 部署服务,参考 etcd.yaml 的配置,查看 etcd 是如何启动的。
 1
 2
 3
 4
 5
 6
 7
 8
 9
10
11
12
13
14
15
16
17
18
19
20
21
22
23
24
|
spec:
  containers:
    - command:
        - etcd
        - --advertise-client-urls=https://192.168.1.202:2379
        - --cert-file=/tmp/etcd/ssl/server.crt
        - --client-cert-auth=true
        - --data-dir=/tmp/etcd/data
        - --experimental-initial-corrupt-check=true
        - --experimental-watch-progress-notify-interval=5s
        - --initial-advertise-peer-urls=https://192.168.1.202:2380
        - --initial-cluster=192.168.1.202=https://192.168.1.202:2380
        - --key-file=/tmp/etcd/ssl/server.key
        - --listen-client-urls=https://127.0.0.1:2379,https://192.168.1.202:2379
        - --listen-metrics-urls=http://0.0.0.0:2381
        - --listen-peer-urls=https://192.168.1.202:2380
        - --name=192.168.1.202
        - --peer-cert-file=/etc/kubernetes/pki/etcd/peer.crt
        - --peer-cert-file=/etc/kubernetes/pki/etcd/peer.crt
        - --peer-client-cert-auth=true
        - --peer-key-file=/etc/kubernetes/pki/etcd/peer.key
        - --peer-trusted-ca-file=/etc/kubernetes/pki/etcd/ca.crt
        - --snapshot-count=10000
        - --trusted-ca-file=/etc/kubernetes/pki/etcd/ca.crt
|
根据我们上面制作证书的步骤和证书的位置,可以将脚本配置成下面的形式。
 1
 2
 3
 4
 5
 6
 7
 8
 9
10
11
12
13
14
15
16
17
18
19
|
etcd --advertise-client-urls=https://192.168.1.202:2379 \
--client-cert-auth=true \
--trusted-ca-file=/tmp/etcd/ssl/k8s.ca.crt \
--cert-file=/tmp/etcd/ssl/etcd_server.crt \
--key-file=/tmp/etcd/ssl/etcd_server.key \
--peer-client-cert-auth=true \
--peer-cert-file=/tmp/etcd/ssl/etcd_server.crt \
--peer-key-file=/tmp/etcd/ssl/etcd_server.key \
--peer-trusted-ca-file=/tmp/etcd/ssl/k8s.ca.crt \
--data-dir=/tmp/etcd/data \
--experimental-initial-corrupt-check=true \
--experimental-watch-progress-notify-interval=5s \
--initial-advertise-peer-urls=https://192.168.1.202:2380 \
--initial-cluster=192.168.1.202=https://192.168.1.202:2380 \
--listen-client-urls=https://127.0.0.1:2379,https://192.168.1.202:2379 \
--listen-metrics-urls=http://0.0.0.0:2381 \
--listen-peer-urls=https://192.168.1.202:2380 \
--name=192.168.1.202 \
--snapshot-count=10000
|
参考资料
- Transport security model
警告
本文最后更新于 2024年9月27日,文中内容可能已过时,请谨慎参考。